This post may contain affiliate links. If you purchase through our links we may earn a small commission at no extra cost to you. Learn more.
Building your own shed saves $1,500–$5,000 compared to buying a kit or hiring a contractor. A well-built wooden shed lasts 20–30 years, can be exactly the size you need, and adds genuine value to your property. This guide walks through everything you need to know before you break ground — from permits and planning through foundation choice, wall framing, roof options, and what tools you’ll need on site.
Before You Start: Permits and Planning
Before you buy a single board, find out whether your shed needs a permit. In most AU councils and US counties, sheds under a certain size are exempt — but the rules vary significantly by location, and a shed built without required approval can be ordered demolished. A 15-minute call to your local council saves thousands.
| Location | Typical permit exemption threshold | Common conditions |
|---|---|---|
| Australia (most states) | Up to 10m² floor area (~10’×10′) | Must meet setback rules from boundaries and house; some states exempt up to 20m² for Class 10a structures |
| USA (most counties) | Up to 120 sq ft (~10’×12′) | Must not be on a permanent foundation in some jurisdictions; HOA rules may be stricter than county rules |
| UK | Up to 15m² if single storey, no sleeping accommodation | Must be more than 2m from a boundary; permitted development rights apply |
| Canada (varies by province) | Up to 10m² in many municipalities | Setback from property lines typically required; check local bylaws |
What triggers a permit in most places: a floor area above the local threshold, a permanent concrete slab foundation, electrical wiring inside the shed, or placement within the setback distance from a boundary or dwelling. Even if your shed is below the threshold, some councils require a simple notification rather than a full permit application — still worth a call.
HOA rules: If you’re in a managed estate or strata, check your HOA or body corporate rules separately from council. HOA restrictions on shed size, colour, and visibility are often stricter than local government rules, and they’re enforced by your neighbours.
Watch Two Complete Shed Builds
Watch the full framing and build process before you start. The first video covers a complete backyard shed build. The second shows detailed wall framing — essential viewing before you touch a stud.
And a second complete build showing detailed framing technique:
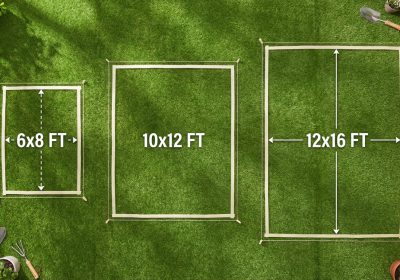
Choosing the Right Shed Size
The most common beginner mistake: building a shed that’s too small. Think about everything you’ll store, then go one size up. Things expand to fill sheds surprisingly fast — the mower is in, then the bikes, then the camping gear, then the “just for now” boxes that never move. Here’s a quick guide:
| Size | Best for | Floor area | Approx. materials cost |
|---|---|---|---|
| 6×8 | Lawn mower, hand tools, bikes | 48 sq ft | $400–$600 |
| 8×10 | Full lawn gear + storage overflow | 80 sq ft | $600–$900 |
| 10×12 | Workshop or large storage | 120 sq ft | $900–$1,400 |
| 12×16 | Full workshop with workbench space | 192 sq ft | $1,400–$2,000 |
| 16×20+ | Serious workshop or garage replacement | 320+ sq ft | $2,000–$3,500 |
Foundation Options — Which Is Right for Your Situation?
Your foundation determines how long your shed lasts and how level it stays over time. The wrong choice for your site adds years of maintenance problems. Use this decision table to choose:
| Foundation type | Best for | Not suitable for | Cost | Permanence |
|---|---|---|---|---|
| Concrete deck blocks (solid blocks) | Small sheds (6×8 to 10×10) on reasonably flat ground; beginners; areas where you might relocate the shed | Slopes over 6″; soft or clay soil; large sheds; cold climates with deep frost | $50–$150 | Non-permanent (important for permit exemptions) |
| Gravel pad with PT skids | Any size shed; moderate slopes; good drainage situations; most experienced builders’ choice for storage sheds | Very soft soil; high water table | $150–$400 | Non-permanent |
| Concrete tube piers | Larger sheds (10×12+); cold climates (pour below frost line); uneven or sloped sites; permanent structures | Situations requiring non-permanent structure; renters; permit-exempt situations in some jurisdictions | $200–$600 | Permanent |
| Concrete slab | Workshop sheds where you want a finished floor; heavy equipment; maximum stability | Budget-sensitive builds; non-permanent situations; areas with permit restrictions on permanent foundations | $500–$1,500 | Permanent — will require a permit in most jurisdictions |
Concrete Deck Blocks (Recommended for Beginners)
Solid concrete deck blocks are the fastest foundation for a small shed. Excavate a few inches at each block location, compact the soil, add 2–3″ of compactable gravel, set the blocks, and use a long level across the tops to bring them into the same plane. The floor joists sit directly on the blocks. No digging to frost depth, no forms, no waiting for concrete to cure. Works well for sheds up to 10×12 on reasonably stable soil.
Gravel Pad with Pressure-Treated Skids
Excavate 4–6″ of topsoil across the entire shed footprint plus 6″ on each side. Lay landscape fabric, then fill with compactable gravel (crusher run or road base) tamped in 2″ lifts to a total depth of 4″. Set two 4×6 pressure-treated skid beams across the width on top of the gravel, levelled and parallel. The floor frame sits on the skids. This is the most common method for medium sheds and is the approach used in our detailed 10×12 shed build guide.
Concrete Tube Piers
Dig holes (with a post-hole digger or rented auger) at each corner and at midpoints for larger sheds. In cold climates, dig below the frost line — 12″ to 48″ depending on your location. Set tube forms, pour concrete, embed post bases in the wet concrete, and let cure for 48–72 hours. The beam structure sits on the post bases. More work upfront, but the most stable foundation for large sheds or difficult soil.
Tools Required for a Shed Build
Unlike furniture builds where a basic drill and saw kit gets you started, shed construction requires a few additional tools. Here’s what you’ll need on site before you start framing:
- Circular saw — For crosscutting studs and ripping sheathing. A 7¼” saw with a framing blade is standard. This is the workhorse tool for the whole build.
- Framing square (24″) — For marking rafter cuts, checking wall corners for square, and laying out stud spacing. Not the same as a speed square — you need both.
- Speed square — Marking 90° and angled cuts on studs quickly, checking plumb.
- 4-foot level — For levelling wall framing and checking foundation blocks. A 2-foot level is not long enough for shed framing.
- Chalk line — For snapping long straight reference lines on the floor decking and for marking stud layout on wall plates.
- Cordless drill/driver — Driving screws in wall sheathing and trim. Have two batteries charged.
- Framing nailer (pneumatic or cordless) or hammer — A framing nailer speeds up stud nailing enormously. For a small shed it’s a nice-to-have; for a larger one it’s worth renting for the day (~$50).
- Ladder (6-foot minimum, 8-foot preferred) — For setting top plates, roof sheathing, and roofing. A step ladder is not sufficient — use an A-frame or extension ladder.
- Tape measure (25 ft) — You’ll use it constantly. Keep it on your belt.
Wall Framing Basics
Shed walls use the same stud framing as house walls, but simpler. The basic pattern: 2×4 studs at 16 inches on centre, between a single bottom plate and a doubled top plate. The doubled top plate is what ties the wall corners together and carries the roof load — do not skip it.
Lay out stud positions on both plates at the same time: set the two plates side-by-side on the floor, mark every 16″ along both simultaneously with a speed square, and mark an X on the right side of each line — that’s where the stud goes. Nail through the plates into the stud ends with two 16d nails each. Stand the completed wall, brace it plumb with a diagonal 2×4 screwed to the floor and the wall, and check with your level before moving on. Frame all four walls before standing any of them — it’s easier to work flat on the floor than to add bracing mid-build.
Roof Options
Lean-To Roof (Easiest)
A single-slope roof: one wall is taller than the opposite wall, and the rafters slope between them. Build the front and back walls to different heights (e.g., front at 96″, back at 80″ for a 12″ pitch over a 10′ depth — about a 1:10 slope), then cut rafters to span between the top plates. Virtually no complex rafter cuts — just a consistent angle on each end. Best for small sheds, shed-lean-tos against a fence, or where maximum wall height matters less.
Gable Roof (Most Common)
The classic peaked roof: two equal slopes meeting at a ridge board at the top. Requires cutting rafters with a bird’s mouth (a notch that seats the rafter on the top plate) and a ridge cut at the peak. Use a rafter square (or a framing square with the rafter tables printed on it) to mark your cuts. The 3-4-5 triangle method is useful for checking that your ridge is centred: the ridge should sit exactly at the centre of the building width. A 4:12 pitch (4″ of rise for every 12″ of run) is the most common for sheds and easy to calculate: for a 10′ wide shed, the run is 5′, so the ridge sits 20″ above the top plate height.
Step-by-Step Build Order
- Mark and prepare the foundation — excavate, set gravel or blocks, level all support points in the same plane. Measure diagonals to confirm the layout is square before you commit.
- Build the floor frame — pressure-treated 2×6 joists on 16″ centres between the rim boards. Install blocking at the midpoint on wider sheds to prevent floor bounce.
- Install ¾” T&G plywood floor decking — tongue-and-groove edges lock together and prevent squeaks. Run the groove edge toward the door so the tongue edge is visible and easier to cut.
- Frame all four walls flat on the floor — mark out, assemble, and check each wall for square before standing it.
- Stand the walls and connect at corners — stand each wall with helpers or a wall jack, toenail into the floor frame, add temporary diagonal bracing to keep walls plumb while you work.
- Install the doubled top plates — overlap the corners with the top layer of the double plate to tie the walls together at each corner.
- Build and install roof frame — for a gable, cut a test rafter first and verify the fit before cutting all the rest. Install rafters or trusses on 24″ centres.
- Install ½” plywood roof sheathing — start at the bottom edge, stagger seams, and leave ⅛” gaps between panels for expansion.
- Install roofing felt and shingles — roofing felt first (staple across the roof from bottom to top, overlapping each row by 6″), then drip edge at the eaves, then shingles from bottom to top.
- Install exterior sheathing or cladding — T1-11 siding (plywood with vertical grooves) is the easiest and fastest option for shed walls. LP SmartSide or fibre cement last longer.
- Install doors, windows, trim, and paint — prime bare wood before painting; exterior-grade paint adds years of life to the framing.
Get Full Shed Plans With Cut Lists
Building a shed from scratch without a good plan is the most reliable way to end up with an expensive mistake — a wall that won’t stand plumb, a roof that doesn’t drain, or a floor that flexes underfoot. A proper plan gives you the exact cut list, framing layout, materials list, and foundation spec before you buy a single board.
My Shed Plans includes 12,000 shed plans covering every size and style — from simple 6×8 lean-tos to 20×40 garage workshops — all with step-by-step instructions, 3D diagrams, and complete cut lists. Every plan specifies exact lumber quantities so you can price materials before you commit.