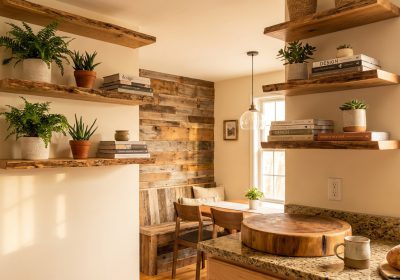
If you want floating shelves with zero visible hardware — no brackets, no keyhole plates, no support arms — the hidden French cleat method is the cleanest way to achieve it. When done correctly, the shelf appears to simply float off the wall with nothing supporting it. The method works because the cleat is built entirely inside a hollow-box shelf. From outside, all you see is a solid-looking timber shelf. Behind the wall surface, two interlocking bevelled strips carry the full load. This guide covers exactly how to make the cleat, how to build the hollow box shelf around it, and how to install it dead level on any wall.
How the Hidden Cleat System Works
A French cleat is two matching strips of timber, each with a 45° bevel cut along one edge. One strip (the male cleat) is screwed to the wall with the bevel facing up and out. The other strip (the female cleat) is built inside the shelf box with the bevel facing down and in. When you hang the shelf, the two bevels interlock — the shelf hooks onto the wall cleat and is held by gravity and the mechanical engagement of the angled joint.
Because the male cleat is fixed to the wall along its entire length, every screw into a stud contributes to holding the shelf. The load is distributed far more evenly than any bracket system. The shelf can be lifted straight off the wall for removal — no tools required.
Making the Cleats
Table Saw Method (Most Accurate)
Set your table saw blade to 45° and rip a length of 42×42mm (or 42×19mm) pine in one pass. This gives you two pieces simultaneously — one male cleat and one female cleat — with perfectly matching angles. This is the fast, accurate method if you have a table saw.
- Set blade tilt to exactly 45°. Check it with an angle gauge or digital bevel box if you have one.
- Set the fence so the cut passes through the centre of the timber’s height.
- Feed the timber through in one smooth, controlled pass with a push stick.
- The two resulting pieces are your matched cleat pair.
Hand Plane Method (No Table Saw)
Mark a 45° line on each end of your cleat timber. Set a No. 5 or No. 4 bench plane to a fine cut and work down to the line, checking with a bevel gauge regularly. It takes longer but produces a perfectly usable result. The surfaces don’t need to be glass-smooth — just flat enough that the two bevels contact each other along their full length.
Building the Hollow Box Shelf
Minimum shelf thickness for adequate rigidity over a 900mm span: 44mm total box height. Less than this and the shelf will flex noticeably under load. The 44mm comes from two panels of 18mm MDF or ply plus a 6–8mm gap between them (filled by the internal cleat and any blocking).
| Part | Qty | Material | Dimensions (mm) |
|---|---|---|---|
| Top panel | 1 | 18mm MDF | Length × depth |
| Bottom panel | 1 | 18mm MDF | Length × depth |
| Front face | 1 | 18mm MDF | Length × 44mm |
| End caps | 2 | 18mm MDF | Depth × 44mm |
| Female cleat (inside shelf) | 1 | 42×19mm pine, bevel cut | Length minus 10mm each end |
| Male cleat (wall) | 1 | 42×19mm pine, bevel cut | Same as female cleat |
- Attach the female cleat to the inside face of the top panel. The bevel faces down. Glue and screw from above (countersink the screws so they’re flush). Position it at the back edge of the top panel so it will sit flush against the wall when the shelf is hung.
- Cut and fit a blocking strip at the front inside edge. This is a strip of timber the same height as the cleat (minus the bevel height), glued to the inside front edge of the top panel. It keeps the bottom panel parallel to the top and prevents racking.
- Glue and nail the bottom panel to the underside of the front blocking strip and the bottom of the female cleat. The bottom panel should be flush with the bottom of the female cleat’s lower face.
- Attach the front face and end caps with glue and finishing nails or pocket screws from inside. Fill all nail holes and any gaps with filler.
- Sand all outside faces to 180 grit. Apply primer and paint, or stain and sealer, before installation.
Wall Installation: Getting a Long Shelf Dead Level
For shelves up to about 600mm, a standard spirit level is sufficient. For longer shelves — 900mm and above — use one of these methods for a reliably level installation:
Laser Level
A self-levelling laser level projects a perfectly horizontal line across the wall. Fix your wall cleat along this line. Most laser levels have a magnetic mount that sticks to a nail driven into the wall — this frees up both hands. This is the fastest and most reliable method.
Water Level
A water level is two pieces of clear tubing connected by a longer hose, filled with water. Water always finds its own level — hold one tube at a reference height mark on the wall, and the water level in the other tube shows you exactly the same height anywhere on the same or adjoining walls. It’s old technology but works perfectly for long spans and across corners where a spirit level won’t reach.
For installation:
- Mark a level line using your chosen method.
- Position the top edge of the wall cleat on this line, bevel facing up and outward.
- Drive two 75mm timber screws into every stud the cleat crosses. Don’t skip studs.
- Hang the shelf over the wall cleat: tilt it at 45°, hook the female cleat over the male cleat, lower the front down flat.
- The shelf should be solid and level. Test by pressing down firmly on the front edge — there should be no movement.
Common Problems and Fixes
- Shelf sits at an angle (not level): The wall cleat isn’t level. Remove the shelf, check the cleat with a spirit level, and adjust before re-driving screws.
- Shelf rocks forward slightly: The female cleat isn’t seated fully on the male cleat — check that the bevel angles match and that the cleats are the same dimensions.
- Shelf feels springy underfoot when loaded: The box needs a mid-span stiffener — glue a short blocking strip inside the box at the 450mm point.
- Gap between shelf back and wall: The wall isn’t flat. Pack the wall cleat with thin shims at low points before fixing.
The hidden cleat method takes slightly more preparation than bracket shelves, but the result is on a different level — literally seamless. For complete plans covering shelf boxes in every size including floating bedside tables, bathroom shelves, and full-wall bookcase systems, Ted’s Woodworking has detailed step-by-step builds for every configuration.