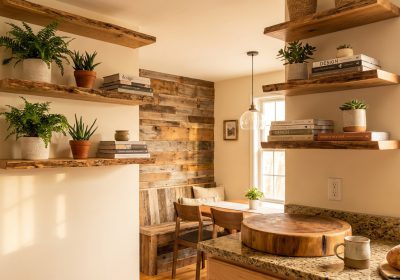
A reclaimed wood feature wall panel is one of the most transformative things you can do to a room — and it’s a genuinely achievable weekend project. Unlike most renovation features that require trades, permits, or specialist skills, a timber feature wall is something a confident beginner can plan, source, and install in a single weekend. The result looks custom, costly, and permanent. Here’s how to do it properly: sourcing the timber, preparing it safely, planning your pattern, and installing a panel that will last decades.
Sourcing Reclaimed Wood in Australia
The character of a reclaimed wall panel comes entirely from the timber — the weathered grey tones, the iron stains from old nails, the colour variation between species and ages of wood. Where you source it matters. Here are the best options in Australia:
Demolition Yards and Salvage Stores
These are your best source for authentic reclaimed timber in volume. Search for “recycled timber” or “salvage yard” in your city — most capital cities have several. Expect to find old hardwood floor boards, oregon beams, cypress pine decking, and hardwood structural timber. These yards price by the lineal metre or the bundle, and quality varies considerably. Go in person, pick through the stock yourself, and look for boards with consistent depth — wildly varying thickness makes installation difficult. In Queensland and NSW, recycled hardwood floor boards (spotted gum, brush box, grey ironbark) are commonly available and create a stunning wall panel.
Facebook Marketplace and Gumtree
Search “old timber”, “recycled boards”, “demolition timber”, or “old fence palings”. House demolitions, fence replacements, and deck pull-outs generate large volumes of timber that owners often give away free or sell cheaply. Old fence palings are an especially good find — they’re typically cypress pine (naturally rot-resistant and highly textured), weathered grey on the face with warm honey tones on the back. Using both faces across a panel creates beautiful tonal variation.
Salvage from Your Own Property
If you’re replacing a deck, fence, or old outbuilding, don’t send the timber to waste. The boards you pull up are perfectly suited to a wall panel — weathered, consistent in origin (which makes them match well), and free. Remove all old hardware, denail carefully, and assess for rot before including any piece in an interior project.
What to Look For
- Consistent depth within batches (you can mix depths across the wall, but it’s easier to work with mostly consistent material)
- No active rot — if the timber is soft, crumbles under finger pressure, or smells musty, it’s not suitable for interior use
- No chemical treatment staining (some old treated pine carries CCA — copper, chromium, arsenic — which is not suitable for interior use; smell and greenish tint are indicators)
- Interesting face texture — nail holes, iron staining, checked grain, and tool marks all add character
Preparing Reclaimed Timber for an Interior Wall
Reclaimed timber from outdoor sources needs proper preparation before going inside your home. Skip this step and you risk introducing pests, moisture, or unstable wood to your walls.
Remove All Hardware
Remove every nail, screw, bolt, and staple. Any metal left in the timber will catch a saw blade, potentially destroy a tool, and create a hazard. Use a metal detector wand (available cheaply online or at hardware stores) to scan each board before sawing. A flat pry bar and nail punch make nail removal faster. For nails that won’t pull cleanly, drive them through with a punch rather than risking tearing the wood face.
Check for Pests
Look carefully for bore holes (round, 1–3mm holes in the timber face or end grain) — these indicate borer beetles, which can remain active and spread to other timber in your home. If you find active borer evidence (fine powdery frass near the holes), treat the timber with a penetrating borate solution (available at Bunnings) before use, or discard affected pieces. Old termite damage (irregular galleries, hollow areas) disqualifies a board from structural or wall use — it will not hold fasteners and may crumble over time.
Clean and Dry
Scrub dirt and debris off with a stiff brush. For heavily soiled timber, a pressure wash followed by two weeks of drying in the sun before installation works well. Moisture content matters — timber that’s too wet will shrink after installation, opening gaps between boards. Ideally, stack the timber inside the room where it will be installed for 1–2 weeks before installing, allowing it to acclimatise to the indoor humidity.
Planning Your Pattern
The pattern you choose affects both the visual outcome and the complexity of installation. Here are the three most popular options:
Horizontal Planks
The simplest pattern — boards run horizontally across the wall, overlapping or butt-jointed at the ends. Consistent board width is ideal but not essential; varying widths can look intentional if managed well. This pattern suits most room styles and is the fastest to install. Start from the bottom and work up, or find the wall’s centre and work both ways for a visually balanced layout.
Herringbone
Boards are cut at 45-degree angles and arranged in a V-pattern — each board meeting its neighbour at 90 degrees to form the herringbone zigzag. This requires consistent board width (rip all boards to the same width before installation), and the 45-degree cuts need to be precise. The visual result is outstanding — a herringbone reclaimed wall panel is a genuine conversation piece. Use a stop block on your mitre saw to cut all left and right pieces to the same length for a consistent pattern.
Chevron
Similar to herringbone but the boards meet in a point rather than a straight line — think of the difference between a V and a zigzag. The centre line of the pattern needs to be established and marked on the wall first, and both halves installed outward from this line. Chevron requires even more precise cutting than herringbone but produces the most dramatic geometric pattern of the three.
Ripping Consistent Widths
Whether you’re doing horizontal, herringbone, or chevron, boards of consistent width make installation dramatically easier. The best way to achieve this is to rip each board to a consistent width before installation using a table saw or a circular saw with a straight-edge guide.
Set your table saw fence to the target width (70mm, 90mm, or 100mm are all popular choices for wall panels). Run each board through once with the best face up. This removes any taper or irregularity in the board’s width and gives you a clean, consistent edge on one side. You don’t need to rip both edges — the rough edge can face down or away from view.
If you don’t have a table saw, a circular saw with a clamped straight-edge fence works just as well for straight rips. Set the fence distance from the blade once, measure twice, and rip consistently.
Installation Method
Backing and Starting Strip
For horizontal plank installation, you don’t always need a full sheet backing. The boards can be nailed directly into the wall studs (locate studs with a stud finder and mark them with pencil lines) using 65mm galvanised nails or 50mm brad nails through a nail gun. For herringbone and chevron patterns, it’s much easier to work on a sheet backing — fix a sheet of 9mm or 12mm structural ply to the wall first, then nail the boards to the ply. This lets you work on the floor partially, nail the sheet on, then add the remaining boards in position.
Start horizontal plank installations from the bottom of the wall with a perfectly level starting strip — this is the foundation line that everything above aligns to. Use a long spirit level or a laser level to set this line. Even 2–3mm of lean at the base will be noticeable by the time you’re halfway up the wall.
Fixing Method
Use a pneumatic brad nailer (available from Bunnings for hire) with 50mm 18-gauge brads for boards up to 19mm thick. Drive two nails per stud per board at a slight downward angle. For thicker reclaimed timber (25mm+), use 65mm nails or pre-drill and fix with decking screws through the face, countersunk and filled.
Leave a 3–5mm gap between adjacent boards if the timber hasn’t been fully dried — this allows for any seasonal movement. If the timber is well-dried and stable, close butt joints look cleaner.
Finishing the Panel
Wire Brushing to Highlight Grain
A wire brush attachment on an angle grinder or drill, run along the grain direction, removes the soft early-wood fibres between the harder late-wood grain lines. This deepens the visual texture dramatically, making the grain “pop” in a way that catches light beautifully. Work with the grain direction, never across it. After wire brushing, vacuum out all loose fibres and wipe with a tack cloth before applying any finish.
Clear Coat for the Weathered Look
The goal is to preserve the natural weathered character while protecting the surface from dust, moisture, and damage. A single coat of matte water-based clear coat achieves this. Avoid satin or gloss finishes — they create a plastic-looking sheen that kills the reclaimed aesthetic. Apply by brush, working with the grain, and allow to fully dry before touching. One coat is usually sufficient for an interior wall panel that won’t receive heavy physical use.
Tools Summary
- Table saw or circular saw with straight-edge guide (ripping consistent widths)
- Mitre saw (cross-cutting to length; essential for herringbone/chevron angle cuts)
- Pneumatic brad nailer or cordless nail gun
- Spirit level or laser level
- Stud finder
- Metal detector wand (for nail detection in reclaimed timber)
- Wire brush attachment (for grain highlighting)
- Measuring tape, pencil, square
Ready to Plan Your Feature Wall?
A reclaimed timber feature wall is a weekend project with a result that genuinely looks like a professional renovation. The sourcing and prep is the majority of the work — once you have clean, consistent timber and a straight starting line, the installation moves quickly. Ted’s Woodworking includes full plans and installation guides for feature wall panels and dozens of other large-format timber projects. If you want step-by-step guidance that takes you from material selection through to the finished panel, it’s worth having in your corner.