Wood wall art is one of the best entry points into woodworking — the projects are small, the materials are cheap, and the results look genuinely impressive hanging on a wall. Whether you’ve got a full workshop or just a jigsaw and a drill, you’ll find something on this list to tackle this weekend. These 15 ideas range from an afternoon of hot glue and timber offcuts through to a full herringbone panel that’ll take up most of a Saturday. Every one of them makes a striking feature piece and a satisfying build.
How to Use This List
The projects below are organised into three skill tiers: beginner (no power tools required or very minimal use), intermediate (basic power tools, some planning), and advanced (joinery, patterns, or more precise cuts needed). Costs are approximate and assume you’re sourcing timber from a hardware store or salvage yard — buying off-cuts or reclaimed wood will cut costs significantly.
| Project | Skill Level | Key Materials | Approx Time | Approx Cost (AUD) |
|---|---|---|---|---|
| Painted Sign | Beginner | Pine board, acrylic paint, stencil | 1–2 hrs | $10–$20 |
| Wood Letter Monogram | Beginner | Craft ply, jigsaw, sandpaper | 2–3 hrs | $15–$25 |
| Wood Slice Clock | Beginner | Large wood slice, clock mechanism, drill | 1–2 hrs | $20–$40 |
| Driftwood Mobile | Beginner | Driftwood pieces, twine, beads | 1–3 hrs | $5–$15 |
| Rope + Wood Wall Hanging | Beginner | Dowel rod, macrame cord, scissors | 2–4 hrs | $15–$30 |
| Painted Pallet Art | Beginner | Pallet, acrylic paint, brushes | 2–4 hrs | $0–$20 |
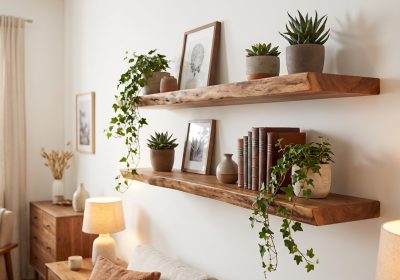
| Reclaimed Wood Panel | Intermediate | Mixed reclaimed timber, backing board, brad nailer | 4–6 hrs | $30–$80 |
| Barnwood Frames | Intermediate | Reclaimed barn timber, mitre saw, glass | 3–5 hrs | $20–$50 |
| Hex Shelves | Intermediate | Pine or ply, mitre saw, wood glue | 4–6 hrs | $40–$80 |
| Wood Bead Curtain Panel | Intermediate | Wooden beads, dowel, twine, paint | 3–5 hrs | $25–$50 |
| Succulent Frame | Intermediate | Timber frame, mesh, succulents, potting mix | 3–4 hrs | $30–$60 |
| Personalised Family Name Sign | Intermediate | Wide pine board, stencil or router, stain | 3–5 hrs | $20–$50 |
| Chevron Pattern Panel | Advanced | Timber strips, mitre saw, MDF backing | 6–10 hrs | $50–$120 |
| Geometric Pattern Art | Advanced | Hardwood off-cuts, table saw, stain | 6–10 hrs | $40–$100 |
| Herringbone Panel | Advanced | Timber strips, mitre saw, MDF backing, adhesive | 8–12 hrs | $60–$150 |
Beginner Projects (No Workshop Required)
1. Painted Sign
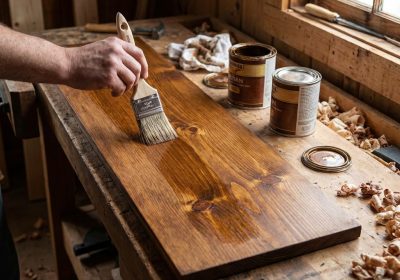
Find a length of dressed pine from the hardware store — a 140x19mm DAR board works perfectly. Sand it smooth with 180-grit, wipe off the dust, then use a vinyl stencil (cut with a craft knife or bought cheaply online) to paint your word: “gather”, “home”, “welcome”. Two coats of chalk paint, peel the stencil while the second coat is still slightly tacky for crisp edges. Add a raw-edge finish with a sander across the face for that worn farmhouse look.
2. Wood Letter Monogram
Print your chosen letter at full size, tape it to 12mm craft plywood, and cut with a jigsaw. Sand the edges smooth. You can leave it natural, paint it, stain it, or wrap it in twine for a boho look. Hang with a D-ring on the back. The whole project costs under $25 and takes about two hours.
3. Wood Slice Clock
Source a large cross-cut timber slice (Bunnings sell them, or find a tree surgeon). Drill a 10mm hole in the centre. Push through a standard clock mechanism kit ($8 at Spotlight or online). Sand the face smooth and apply a coat of Danish oil to show off the grain. Use small twig offcuts as hour markers instead of numbers for a natural look.
4. Driftwood Mobile
Collect driftwood from the beach or buy a bundle online. Arrange three horizontal pieces suspended from each other with twine, adding hanging elements — small shells, wooden beads, or painted timber offcuts — between each level. This is a zero-tools project that looks effortlessly coastal in a bedroom or nursery.
5. Rope and Wood Wall Hanging
Cut a 600mm length of 25mm dowel rod. Fold lengths of 5mm natural cotton macrame cord in half over the dowel using lark’s head knots. Knot the hanging cords in square knots to create a woven panel. Trim the bottom fringe at an angle. Add a few wooden beads mid-cord for texture. Takes an afternoon and costs under $30.
6. Painted Pallet Art
Source a heat-treated pallet (look for the HT stamp — avoid chemically treated ones). Sand the face boards lightly, then use stencils or freehand to paint a scene or quote across the boards. Seal with a spray matte varnish. Free timber, the whole project can cost $0 if you have leftover paint.
Intermediate Projects (Basic Power Tools)
7. Reclaimed Wood Panel
This is the entry-level feature wall piece. Cut reclaimed timber planks to consistent lengths and nail them in rows to a sheet of 9mm ply backing using a brad nailer. Mix widths and textures for a patchwork look. Wire brush the surface to emphasise grain before hanging. See our full guide in the reclaimed wall art article for more detail on sourcing and prepping.
8. Barnwood Frames
Cut four lengths of reclaimed barn timber at 45-degree mitres using a sliding mitre saw. Glue and nail the corners, clamp until set, then drop in a piece of glass cut to size (most hardware stores cut glass). The weathered grey timber creates a frame that would cost $80+ in a homewares shop for about $20 in materials.
9. Hexagonal Shelves
Cut 6 equal lengths of 42x19mm pine at 30-degree angles on each end. Glue and nail them into a hexagon shape, clamp with a band clamp, let dry overnight. Mount to the wall with two keyhole brackets routed into the back. Cluster three or five together at different heights for maximum impact.
10. Wood Bead Curtain Panel
Thread large wooden beads onto individual lengths of strong twine, knotting between every 3–4 beads. Tie each strand to a painted or stained dowel rod. Vary bead sizes and paint some in contrasting colours. Hang as a wide panel — these work especially well in doorways or as a room divider in a studio apartment.
11. Succulent Frame
Build a shallow shadow-box frame from 70x19mm pine. Staple fine galvanised mesh across the back. Fill with a mixture of potting mix and perlite, pack in small succulents through the mesh openings. Hang vertically — the succulents hold into the mesh. Water sparingly by laying flat every few weeks. This one takes longer to “finish” as the succulents grow in, but it looks incredible.
12. Personalised Family Name Sign
Use a wide pine board (184x19mm or wider) and either stencil or router your family surname. Sand, stain in a warm walnut, and add a coat of satin varnish. Add a small date below in a contrasting font. Simple but meaningful — and it makes one of the best housewarming gifts you can give.
Advanced Projects (Joinery and Precision Cuts)
13. Chevron Pattern Panel
Rip your timber into consistent 50mm-wide strips. Cut each strip at precise 45-degree mitres so left and right pieces meet in a V. Glue strips to an MDF backing board in alternating V patterns. The critical skill is consistent miter angles — even 1 degree of error adds up across a panel. A stop block on your mitre saw makes this repeatable. Sand the whole panel flush after the glue cures.
14. Geometric Pattern Art
Use hardwood off-cuts in different species — a mix of spotted gum, blackwood, and pine creates natural colour contrast without stain. Cut precise triangles, diamonds, and rectangles on the table saw. Arrange them in a geometric mosaic on an MDF backing, using wood glue to fix each piece. Sand the entire face flush with an orbital sander, then finish with a clear coat to let the natural grain contrasts shine.
15. Herringbone Panel
The showpiece of timber wall art. Rip consistent 70mm-wide strips, then cut each at 45 degrees to create the herringbone angle. Lay out the pattern on your MDF backing before gluing — the pattern locks together in a satisfying zigzag. Use a straight edge to keep your rows true. Sand flush, then stain or leave natural. A full herringbone panel takes a full day but will be the most-commented-on thing in your home.
Take Your Projects Further
These 15 projects are just the beginning. If you’re ready to move beyond weekend one-offs into proper woodworking plans with detailed cut lists, step-by-step instructions, and full material lists, Ted’s Woodworking gives you access to over 16,000 plans — including dozens of wall art and home decor projects with beginner-friendly instructions. It’s the fastest way to build your skills and keep your weekends full of great projects.