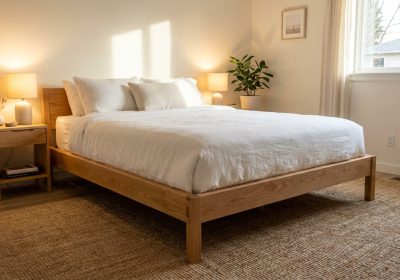
A floating bed frame is one of those builds that looks far more complicated than it actually is. The secret is simple: recess the legs 100–150mm back from every edge of the frame, and the mattress platform appears to hover above the floor. There are no hidden electronics, no mirrors, no tricks — just a well-proportioned timber frame and a few thoughtful design decisions. This guide walks you through building a Queen-size floating platform bed for an Australian Queen mattress (1530×2030mm), using standard DAR pine or LVL from Bunnings or any local timber yard.
Why the Floating Look Works
Standard bed frames sit on legs positioned right at the corners. Move those legs inward by 100–150mm on all four sides and the visual weight of the frame disappears. The shadow gap between the base of the platform and the floor does the rest. Keep the platform low — aim for a finished height of 280–320mm to the top of the mattress platform — and the illusion is even stronger. This height is also ergonomically comfortable: roughly the same as sitting on a standard chair seat.
Materials and Cut List
The main frame is built from 140×45mm DAR (Dressed All Round) pine. This is a structural grade widely available in 2.4m, 3.0m and 4.2m lengths. LVL (Laminated Veneer Lumber) is a stronger alternative if you can source it — it will not cup or warp over time the way pine can. The slats are 140×19mm pine, which is cheap, stiff enough across a 530mm span, and easy to cut to length.
| Part | Qty | Dimensions (mm) | Material | Notes |
|---|---|---|---|---|
| Long side rails | 2 | 2030 × 140 × 45 | DAR pine or LVL | Full mattress length |
| Short end rails | 2 | 1530 × 140 × 45 | DAR pine or LVL | Fit between long rails |
| Centre support beam | 1 | 1440 × 140 × 45 | DAR pine or LVL | Spans short dimension |
| Legs (corner) | 4 | 90 × 90 × 200 | DAR pine or hardwood | Height to suit platform height |
| Centre leg | 1 | 90 × 90 × 200 | DAR pine or hardwood | Under centre beam |
| Bed slats | 14 | 1530 × 140 × 19 | Pine | Spans short dimension |
| Slat support ledger | 2 | 2030 × 38 × 19 | Pine | Fixed inside long rails |
Mattress reference: Australian Queen = 1530mm wide × 2030mm long. The frame’s inner dimensions match these exactly; the outer frame dimensions are 1620mm × 2120mm (adding 45mm rail thickness each side).
Why a Centre Leg Is Non-Negotiable for Queen and Larger
Any bed wider than about 1200mm needs a central support beam with at least one centre leg. Without it, the centre span of the slats will deflect over time under a mattress and two adults. Most mattress warranties (Sealy, Sleepmaker, A.H. Beard) specifically require support legs at no more than 600mm intervals along the length, or they will void the warranty. For a Queen, one centre leg at the midpoint is the minimum. For a King (1830mm wide), add a second leg offset by 300mm either side of centre.
Step-by-Step Build Guide
Step 1: Cut All Timber to Length
Cut the long side rails, end rails, and centre beam to length using a drop saw or circular saw with a guide. Mark and cut your legs to equal height — 200mm gives a platform height of roughly 300mm to the top of the slats once all components are stacked. Sand all cut ends with 80-grit before assembly.
Step 2: Attach the Slat Ledgers
The slat ledger strips run along the inside face of each long rail, positioned so the top of the ledger sits 19mm below the top of the rail. This recess means the slats sit flush with or just below the top of the rail, which matters for mattress support. Glue and screw the ledgers using 50mm screws at 300mm intervals. Pre-drill to prevent splitting — this is important in pine.
Step 3: Assemble the Outer Frame
Join the end rails between the long rails using 120mm structural screws (two per joint) with a timber or metal connector bracket on the inside face for extra rigidity. Glue the joint faces before screwing. Check for square by measuring diagonals — they must be equal. Clamp until the glue sets if possible.
Step 4: Install the Centre Beam
Fix the centre support beam across the short dimension at the midpoint of the long rails (approximately 1015mm from each end). Use joist hangers (Mitek or similar) or notch the beam into the rail face — notching is stronger but requires a router or careful chisel work. The centre beam should be level with the slat ledgers.
Step 5: Attach the Legs
The floating effect requires legs positioned 100–150mm in from each corner of the outer frame. Mark these positions, then attach the legs using two 120mm screws driven up through the bottom of the leg into the rail, plus a metal angle bracket on the inside face. For the centre leg, attach it to the underside of the centre beam with two screws each way. Check all legs are plumb before final tightening.
Step 6: Fit the Slats
Rest the slats across the ledgers and the centre beam, starting from one end. The key spacing rule: maximum 75mm gap between slats. Most mattress manufacturers specify this as the maximum void size to maintain warranty. With 14 slats of 140mm width across a 2030mm length, the spacing works out to approximately 13 slats inside the frame plus two end slats, leaving gaps well under 75mm. Use a scrap piece of 50×50mm timber as a spacer to set consistent gaps as you go. Fix each slat to the ledger with a single 40mm screw at each end — do not glue, as slats need to be replaceable.
Step 7: Sand and Finish
Sand the entire frame progressively: 80-grit to remove machine marks, 120-grit to smooth, 180-grit for a final pass. Pay extra attention to the top edges of the side rails where they will be touched. For finish, you have three practical options depending on your aesthetic:
- Stain + polyurethane: Bunnings Feast Watson stain in your chosen colour, then 2–3 coats of water-based poly. Easy to apply, durable, repairable.
- Painted: Primer coat followed by 2 coats of semi-gloss enamel. Great for white or dark painted bedrooms.
- Natural hardwax oil: Rubio Monocoat or Osmo Polyx. One coat, penetrates the timber, food-safe, beautiful natural look. Best on hardwood legs.
Headboard Options
The floating frame design works with any headboard style. The simplest approach: attach a French cleat to the wall at the right height and hang a panel headboard from it — no fasteners into the bed frame required. Alternatively, fix two vertical posts (90×45mm, 900mm tall) to the back end rail to create a simple slatted or panel headboard directly integrated into the frame.
Final Checks Before the Mattress Goes On
Before placing the mattress, sit in the centre of the slat platform and bounce. There should be no creak and no visible flex at the centre. Creak usually means a dry joint — pull that slat, add a drop of PVA to the ledger, and re-screw. Flex means the centre leg is not in firm contact with the floor — add an adjustable foot pad to take up any gap.
Building a floating bed frame takes a weekend and costs around $200–$280 in materials for a Queen size. The result is a piece of furniture that looks like it costs ten times that from a furniture store.
Want More Plans Like This?
If you want step-by-step plans for more furniture builds — bed frames, wardrobes, tables, outdoor furniture — Ted’s Woodworking has over 16,000 projects with detailed cut lists, material lists and assembly diagrams. It is one of the most comprehensive plan libraries available for home woodworkers and is regularly updated with new designs.