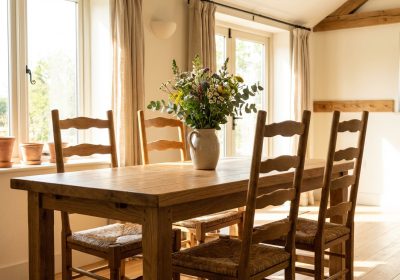
A farmhouse table and bench set is the single most popular furniture project in the beginner woodworking world — and for good reason. The construction is straightforward, the materials are cheap and available at any hardware store, and the finished result looks genuinely impressive. This guide covers the complete set: a 1800×900mm table and two matching 1800×350mm benches, built with pocket hole joinery throughout. No complicated mortise and tenon, no specialist tools. Just a pocket hole jig, a drill, and a circular saw or mitre saw.
Materials and Cut List
All timber is standard DAR (dressed all round) pine, available at Bunnings, Mitre 10, or any timber yard. The 4×4 (90×90mm) legs are the structural backbone of the farmhouse look — chunky, honest, and strong. Don’t substitute smaller section timber for the legs; the visual weight is part of the aesthetic.
Full Cut List: Table + 2 Benches
| Part | Piece | Qty | Timber Size | Cut Length (mm) | Notes |
|---|---|---|---|---|---|
| TABLE | Top boards | 5 | 19×190mm DAR pine | 1800 | Edge-joined for a 950mm top |
| Breadboard ends | 2 | 19×90mm DAR pine | 920 | Across the grain, prevents cupping | |
| Long apron | 2 | 19×90mm DAR pine | 1620 | Inner face of long sides | |
| Short apron | 2 | 19×90mm DAR pine | 720 | Inner face of short sides | |
| Legs | 4 | 90×90mm DAR pine | 730 | Finished height ~740mm with top | |
| BENCH (×2) | Top boards | 2 | 19×190mm DAR pine | 1800 | Two boards make 380mm width |
| Long apron | 2 | 19×70mm DAR pine | 1620 | Per bench | |
| Short apron | 2 | 19×70mm DAR pine | 270 | Per bench | |
| Legs | 4 | 90×90mm DAR pine | 440 | Per bench — seat height 450mm |
Why 4×4 Legs Are Perfect for Farmhouse Style
The 90×90mm (nominally “4×4”) post is the defining element of the farmhouse table aesthetic. The chunky section looks deliberate and strong — it reads as honest, utilitarian furniture. There’s no trying to be dainty about it. Practically, it’s also cheap. A length of 90×90mm pine is one of the most common structural timber sections at any hardware store, and at around $8–10 per metre, you won’t break the budget. The bench legs are cut from the same section, which means one trip to the timber yard covers everything.
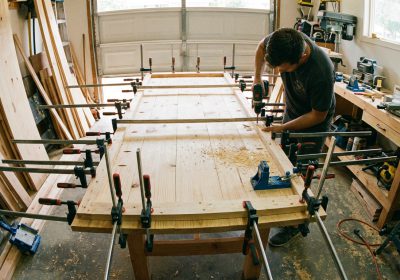
Step-by-Step: Building the Table
- Mill the top boards. If your boards have rough spots, run a hand plane over the faces or have the timber yard surface them. Lay them out and choose the best face arrangement — alternate the growth ring direction on adjacent boards to reduce cupping over time.
- Drill pocket holes on the top board edges. Use your pocket hole jig (Kreg K4 or K5 is the benchmark) set for 19mm stock. Drill two pocket holes every 300mm along each board edge. Apply wood glue, clamp edge to edge, and drive pocket screws to pull the joints tight.
- Attach the breadboard ends. Breadboard ends run across the grain at each short end of the table. They keep the top flat by resisting cupping. The critical rule: do not glue a breadboard solid to the top. Pine moves significantly with seasonal humidity changes. Glue only at the centre 50mm; the rest is attached with elongated slots and a screw with no glue, allowing the top to expand and contract. Drill oversized holes or cut a slot in the breadboard, drive a screw through but don’t overtighten.
- Build the leg-and-apron frame. Cut your apron boards to length. Drill pocket holes on the inside face of each apron end. Apply glue and join aprons to legs, checking for square at each corner with a framing square. Clamp and drive pocket screws.
- Brace and check square. Measure diagonals: if both diagonals are equal, the frame is square. If not, clamp across the longer diagonal to rack it square before the glue sets.
- Attach the top. Turn the frame upside down, centre it on the underside of the top, and clamp in place. Drive pocket screws up through the inside of the apron into the underside of the top. Use figure-8 clips if you want to allow more wood movement (see article on round tables for details). Three to four fixings per long apron is adequate.
Step-by-Step: Building the Benches
The bench is identical in construction to the table — just narrower and shorter. The top is two boards (approximately 380mm wide), the aprons are shallower, and the legs are cut to 440mm for a 450mm seat height. Follow the same steps: pocket holes to join boards, leg-and-apron frame assembled with pocket screws, top attached from below.
One difference: benches don’t need breadboard ends because a two-board top is narrow enough that cupping is rarely a problem. You can add them for consistency of appearance if you like.
Finishing: Dark Walnut Stain + Matte Polyurethane
The classic farmhouse finish is dark walnut stain under a matte polyurethane topcoat. This combination gives the table its characteristic warm, aged look while protecting it from daily wear.
- Sand everything to 180 grit. Pay attention to the apron-to-leg joints — any squeeze-out of dried glue will block the stain and leave pale patches. Chisel off any glue squeeze-out before sanding.
- Wipe with a damp cloth to raise the grain, let dry, then sand lightly again at 180 grit.
- Apply stain with a cloth or brush. Feast Watson Natural Walnut or Cabots Dark Walnut work well on pine. Wipe on, let sit for 2–3 minutes, wipe off excess. Pine is prone to blotchiness — applying a pre-conditioner (thinned shellac or dedicated wood conditioner) first helps the stain go on evenly.
- Let stain dry fully (minimum 4 hours, overnight is better).
- Apply matte polyurethane. Brush on two to three coats, sanding lightly with 320 grit between coats. The matte sheen keeps the farmhouse look; satin or gloss will make it look too polished.
Common Mistakes to Avoid
- Gluing breadboard ends solid — the top will crack as the timber moves seasonally
- Skipping the pre-conditioner on pine — uneven stain absorption on pine is very noticeable
- Not checking square during the apron-to-leg assembly — a racked frame is very hard to correct after the glue cures
- Using 45mm pocket screws where 32mm is correct — oversized screws for the material thickness will blow out the face
This is a genuinely achievable two-weekend project with materials that cost around $250–$350 for the full table-and-bench set. For detailed plans with exact dimensions, joinery diagrams, and finish guides for this and hundreds of other furniture builds, check out Ted’s Woodworking — it’s the most comprehensive plans library available for home woodworkers.