This post may contain affiliate links. If you purchase through our links we may earn a small commission at no extra cost to you. Learn more.
Woodworking isn’t just for furniture and sheds. Some of the most satisfying projects are small home décor pieces you can build in a single afternoon — floating shelves, wooden signs, picture frames, geometric wall art. These also make the best handmade gifts, and many of them sell well at craft fairs and on Etsy. This guide gives you complete cut lists and step-by-step instructions for the most popular small woodworking projects, so you can go from reading this to finished product in one weekend.
Floating Shelf Plans
Floating shelves are the single most-searched woodworking project online. They look like they’re attached to magic — no visible brackets — and they’re actually straightforward to build once you understand the hidden cleat system. The secret: a plywood cleat screwed directly into wall studs, with a hollow shelf box that slides over it from the front.
Cut List — 24″ Floating Shelf
| Part | Qty | Material | Actual dimensions |
|---|---|---|---|
| Wall cleat | 1 | ¾” plywood | ¾” × 6″ × 16″ |
| Shelf top | 1 | ¾” pine or hardwood | ¾” × 8″ × 24″ |
| Shelf bottom | 1 | ¾” pine or hardwood | ¾” × 8″ × 24″ |
| Front face | 1 | ¾” pine or hardwood | ¾” × 2″ × 24″ |
Hardware: 2× 3″ lag screws (into studs), wood glue, 1¼” finish nails or brad nails for face attachment.
Step-by-Step Instructions
- Find your wall studs — use a stud finder or knock along the wall (solid thud = stud, hollow = cavity). Mark stud centres with a pencil. The cleat must hit at least two studs for safe load-bearing. Standard stud spacing is 16″ on centre.
- Install the wall cleat — hold the 16″ cleat against the wall, level it with a spirit level, and drill pilot holes through it into the stud centres. Drive 3″ lag screws (or 3″ structural screws) through the cleat into each stud. The cleat should feel completely rigid — any movement here means the shelf will wobble.
- Build the shelf box — glue and nail the top and bottom pieces to the front face, creating a three-sided U-shape open at the back. The interior depth of the box should be just slightly larger than the cleat depth (6¼” box interior for a 6″ cleat) so the box slides on snugly but doesn’t require force.
- Sand and finish before assembly — sand the box to 220 grit and apply your finish (stain + polyurethane, or paint) before sliding it onto the wall. It’s much easier to finish the box as a unit than to cut in around the wall after installation.
- Slide the box onto the cleat — once the finish is dry, slide the shelf box over the cleat from the front. A snug fit holds it in place without any visible fasteners. If you want additional security (for heavy loads or in households with children), drive a finish nail up through the bottom of the box into the cleat from inside — invisible from the outside.
Estimated cost: $12–$18 per shelf. Build time: 2 hours per shelf (plus finish drying time). A set of three matching shelves: a Saturday morning.
DIY Wood Wall Art
Wood wall art has exploded on Pinterest and Instagram because it looks expensive and is cheap to make. The most popular styles — and the dimensions and materials for each:
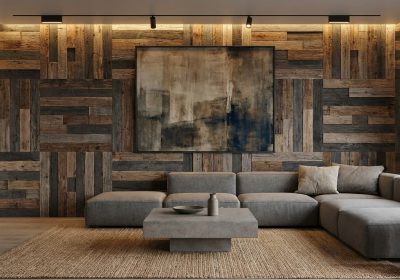
Reclaimed Wood Feature Wall
Cut boards of varying widths from common pine 1×4, 1×6, and 1×8 stock, then stain them in two or three different shades of brown and grey before installation. The visual appeal comes from the variation in widths and tones — not from the wood itself. For a standard accent wall behind a sofa (approximately 8′ wide × 8′ tall), you’ll need approximately 85–90 linear feet of boards in mixed widths. Nail them horizontally to the wall with finish nails driven into studs or with construction adhesive on drywall. Leave slight random gaps between some boards for authenticity.
Materials: Mix of 1×4, 1×6, and 1×8 pine at 8′ lengths (roughly 12–14 boards), Minwax stain in Early American, Dark Walnut, and Classic Grey, finish nails or Liquid Nails construction adhesive. Cost: $40–$80 for a full accent wall.
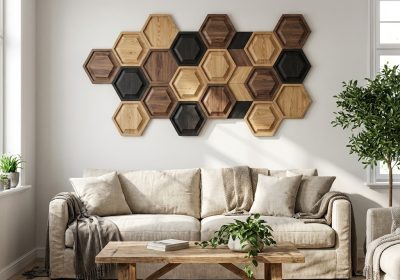
Geometric Wood Panel
Cut 1×2 or 1×3 strips at 45-degree angles and arrange them in a herringbone or chevron pattern on a ½” plywood backing sheet. The backing can be a standard 4’×4′ or 4’×8′ panel depending on how large you want the finished piece. Paint or stain the strips and the backing in contrasting colours before gluing the strips down — it’s much easier to mask and paint flat pieces than to cut in around installed strips. Finish with a thin coat of matte polyurethane over everything, then hang the whole panel like a painting on a French cleat or two D-rings.
Materials for a 24″×36″ panel: ½” plywood backing at 24″×36″, approximately 12 linear feet of 1×2 pine ripped at 45°, paint or stain in two colours. Cost: $20–$35.
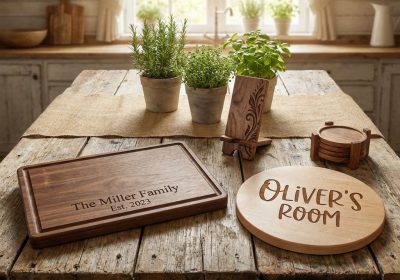
Wooden Word Signs
The base board is a 1×8 or 1×10 pine board cut to your required length (a common sign size is 8″×24″ for a short phrase, or 10″×36″ for longer text). For the letters, the simplest method for beginners is to print your text at the correct size, transfer it to the wood with carbon paper, then use a router with a ¼” straight bit to carve the letters ⅛” deep. Paint the routed letters with a contrasting colour after the background is sanded and painted. Sand the face lightly with 220 grit after the paint dries to knock back any raised grain, then seal with a flat clear coat.
If you don’t have a router, adhesive vinyl letters (cut with a Cricut or bought at a craft store) give a similar result for gift-level signs. For craft fair sales, routed letters look far more professional and hold up better over time.
Cost per sign: $8–$15 in materials. Retail value at craft fairs: $20–$60.
Handmade Wooden Gifts
Cutting Board (Best Beginner Gift Project)
A hardwood cutting board is one of the most popular woodworking gifts for good reason: it looks impressive, it’s genuinely useful, and it’s approachable for a beginner. A face-grain board (boards laid flat, face-up) is the simplest version. An end-grain board (boards stood on end so the cut surface is exposed) looks stunning and is gentler on knife edges, but requires more precise machining and a flat surface for glue-up.
Face-grain cutting board process:
- Rip maple or walnut into strips of consistent width — common widths are 1½” to 2″. For a board approximately 8″×12″, you’ll need four to six strips at 12″ length.
- Alternate the wood species for the striped look (maple and walnut are the classic pairing). Arrange the strips so growth rings alternate direction — this reduces cupping as the board dries and wets over time.
- Apply a thin, even coat of Titebond II to each mating edge. Press the strips together and apply bar clamps across the width. Tighten until glue squeeze-out appears at every joint. Wipe squeeze-out immediately with a damp cloth. Let cure overnight.
- Once dry, plane or sand the surface flat. If you have access to a thickness planer, one pass at a time until both faces are flat. Without a planer, use an orbital sander at 80 grit working diagonally across the joints, then progressively through 120 and 220.
- Round the edges with a ⅜” roundover bit in a router, or by hand with 80 grit sandpaper followed by 120 and 220.
- Apply food-safe mineral oil generously — wipe it on, let it soak for 20 minutes, wipe off the excess. Repeat three times. Finish with a beeswax and mineral oil paste (available pre-made, or make your own: melt beeswax into warm mineral oil at roughly 1:4 ratio by volume, let cool). Never use vegetable or olive oil — they go rancid inside the wood.
Estimated cost: $15–$25 in materials. Retail value: $40–$80.
Jewellery Box
A basic hinged box with a felt-lined interior is a classic gift project that teaches accurate small-piece work, hinge installation, and fine finishing — skills that transfer directly to cabinet and furniture work.
Cut List — Jewellery Box (10″L × 6″W × 4″H)
| Part | Qty | Material | Actual dimensions |
|---|---|---|---|
| Long sides | 2 | ½” Baltic birch plywood | ½” × 4″ × 10″ |
| Short sides | 2 | ½” Baltic birch plywood | ½” × 4″ × 5″ |
| Bottom | 1 | ½” Baltic birch plywood | ½” × 5″ × 10″ |
| Lid | 1 | ½” Baltic birch plywood | ½” × 6″ × 10½” |
| Lid frame (front) | 1 | ¼” Baltic birch plywood | ¼” × 1″ × 10½” |
| Lid frame (sides) | 2 | ¼” Baltic birch plywood | ¼” × 1″ × 6″ |
Hardware: 1× piano hinge at 10″ (cut to length with a hacksaw if needed), 1× small box clasp or magnetic latch, self-adhesive velvet liner sheets (available in craft stores), wood glue, 1″ brad nails.
Key tips: Baltic birch plywood is ideal for boxes because its void-free core means clean edges at ½” thickness — unlike standard plywood which can have voids that look terrible on exposed box edges. Sand all interior faces to 220 and apply finish before assembly. Apply the velvet liner last, after the finish is fully cured. Install the piano hinge with the box closed, clamp the lid in position, and use a self-centring bit to drill pilot holes — this ensures the lid sits perfectly flush.
Estimated cost: $15–$25. Retail value: $30–$60. Build time: Half a day.
Wooden Picture Frame
Picture frames require accurate 45-degree mitre cuts — if your mitres are off by even 1 degree, the corners won’t close. This is the most skill-building small project on this list. A mitre box and hand saw works for simple frames; a powered mitre saw makes it dramatically more repeatable.
Cut list for a standard 5″×7″ photo frame from 1×3 poplar:
- 2× long sides: 1×3 poplar (actual ¾” × 2½”), cut to 9½” at the long point of the 45° mitre (this accommodates the 7″ photo with a ¼” rabbet on each side)
- 2× short sides: 1×3 poplar, cut to 7½” at the long point (accommodates the 5″ photo)
Rabbet: Route a ¼” × ¼” rabbet along the back inner edge of each piece (before mitring the corners) to accept the glass, mat, photo, and backing. The rabbet depth of ¼” accommodates: glass (⅛”) + mat board (⅛”) + photo. Assemble corners with wood glue and V-nail fasteners driven from the back. Sand to 220, apply stain or paint, and finish with a flat or satin clear coat — gloss is rarely appropriate for frames.
Estimated cost: $8–$15 per frame. Build time: 2–3 hours including finish.
Kids’ Woodworking Projects
Building something for or with a child is one of the most rewarding woodworking experiences. The best kids’ projects combine simplicity for the builder with genuine delight for the recipient. Three builds that always land well:
- Step stool with name routed or burned in: Two ½” plywood sides (shaped like a staircase profile), 1× 1×8 step on top, 1× 1×8 step on the middle riser, connected with pocket screws. Total cost: $12–$18. Build time: 2 hours.
- Toy box with a safe slow-close lid: Built from ¾” plywood — the basic carcass is a box with a hinged lid. Install lid support hinges rated for the lid weight so the lid stays open when a child reaches in and doesn’t slam shut on fingers. Total cost: $35–$55. Build time: half a day.
- Simple wooden push toy or car: Body from a 2×4 cutoff, wheels from ¾” plywood cut into circles with a circle jig on a jigsaw (or purchased pre-made wooden wheels at craft stores), dowel axles. No finishing required — just sand smooth to 220 and apply a food-safe mineral oil finish. Total cost: $5–$10.
Finishing: Staining, Painting, and Sealing
The finish is what separates a project that looks homemade from one that looks professional. The wood can be imperfect; the finish rarely lies. Key rules for getting it right:
- Always sand to 220 grit before any finish — 180-grit scratches are visible through stain, and impossible to fix after the stain goes on. The sequence matters: 80 → 120 → 180 → 220, always finishing with the grain on the final pass.
- Apply pre-stain wood conditioner to pine before staining — pine is highly porous and absorbs stain unevenly, especially around knots. Pre-stain conditioner (Minwax makes one) prevents blotchy absorption. Apply, let sit 15 minutes, wipe off the excess, then stain within 2 hours.
- Two thin coats of stain beat one thick coat every time — a thick coat of stain sits on the surface rather than penetrating the grain, dries tacky, and looks muddy. Apply stain with a lint-free rag, work it in with the grain, and wipe off the excess within 5 minutes.
- For furniture, use water-based polyurethane in 2–3 coats — water-based dries faster, doesn’t yellow over time (unlike oil-based), and cleans up with water. Thin the first coat 10% with water to seal the grain. Sand lightly with 320 grit between coats, wipe dust with a tack cloth. Do not sand the final coat — just let it cure for 24–48 hours before use.
- For outdoor projects, use exterior-grade oil or penetrating sealer — products like Cabot Australian Timber Oil, Thompson’s WaterSeal, or Penofin penetrate into the wood fibres rather than forming a surface film. They need reapplying every 1–2 years but don’t peel or crack like surface finishes do outdoors.
Get 16,000 Décor and Gift Plans
Every project on this page has dozens of variations — different sizes, species, finish styles, and joinery approaches. Ted’s Woodworking includes plans for home décor, toys, boxes, frames, shelving, and hundreds of other small and gift projects alongside the full furniture and shed library — each with a complete cut list and step-by-step instructions. If you build even one or two of the projects on this page and want to keep going, it’s the most complete resource available.