The 10×12 shed has earned its reputation as the sweet spot of backyard storage. At 11.1m², it sits right at — or fractionally above — the common 10m² permit threshold, which means it often qualifies as exempt development in many Australian council areas (always check yours). More importantly, it’s large enough to hold everything a busy household accumulates in the backyard: a full-size push mower, a set of long-handled tools, bikes, garden chemicals, seasonal equipment, and a workbench — without feeling cramped. For most Australian backyards, this is the size to build.
Why 10×12 Works So Well
The proportions of a 10×12 shed work in your favour. The 3.0m width (10ft) is wide enough for a standard single-door entry plus a mowing bay alongside each other. The 3.6m depth (12ft) gives you room for deep shelving at the back wall, a mid-floor clear zone, and either a workbench or bike storage near the door. The ceiling height of 2.4m is comfortable for adults to work in without feeling confined.
Compare this to an 8×10 (7.4m²) and the difference becomes clear immediately: the extra 3.7m² in a 10×12 is what lets you fit a workshop corner without stealing the mowing bay, or hang two bikes without blocking access to the shelf behind them. The incremental cost of stepping up from 8×10 to 10×12 is modest — roughly 30% more in materials — but the usable space increase is disproportionately larger.
Layout Options
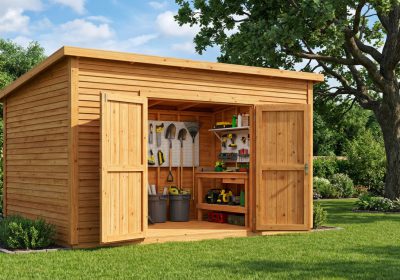
Option 1: Pure Storage Layout
Shelving along both long walls and the rear short wall. Lawnmower bay in the centre-front. Bikes on ceiling hooks or wall-mounted hooks near the door. Garden chemicals and small items on shelves 1.5m high and above. Long-handled tools on a pegboard or wall mount. This layout maximises storage volume with no compromises for workspace — everything has a defined spot.
Option 2: Workshop Corner Layout
Workbench (1.8–2.4m long, 600mm deep) installed along the rear wall with shelving above. Tool chests or rolling cabinets on one side wall. The remaining two-thirds of the floor left clear for equipment storage and workspace. Add a window above the workbench for natural light — a 600×900mm aluminium awning window is a standard cost-effective choice available from most AU hardware retailers.
Permit Check
At 11.1m², a 10×12 shed is just over the 10m² threshold that most Australian councils use as the permit-free cut-off for Class 10a outbuildings. Some councils apply the threshold strictly; others use it as a guide. Many will approve a 10×12 as exempt if it’s under 3.0m in height, meets setback requirements, and uses compliant cladding. Check with your local council before starting. In many LGAs, a straightforward planning confirmation takes only a phone call or an online query through the council portal. Getting caught without a required permit can result in fines or a demolition order — it’s not worth risking.
Material List Overview
| Component | Specification | Approx Qty | Notes |
|---|---|---|---|
| Wall framing timber | 90×45mm MGP10 pine | ~160 lm | Plates, studs, blocking |
| Roof rafters | 90×45mm MGP10 pine | ~24 lm | 12 rafters at ~2.0m each (gable, 20° pitch) |
| Ridge board | 140×19mm DAR pine | 3.6m | One length |
| Floor bearers (skids) | 140×45mm H3 treated pine | ~12 lm | 3 skids × 3.6m |
| Floor joists | 90×45mm H3 treated pine | ~27 lm | 9 joists × 3.0m |
| Floor decking | 19mm H3 treated plywood | 6 sheets | 2400×1200mm sheets |
| Wall cladding | Hardiflex or Colorbond | ~36 m² | All four walls |
| Roofing | Corrugated iron or Colorbond | ~8 sheets | 1800×900mm coverage per sheet (varies) |
| Fasteners | Galvanised nails, Tek screws, joist hangers | Assorted | Allow $150–$250 for hardware |
This table is a planning guide only. Exact quantities depend on your specific plan, roof pitch, door/window placement, and cladding choice. Always add 10% to material quantities for waste and cutting.
Timber Skid Foundation: The Simplest Option
For a 10×12 shed, a timber skid foundation is the most popular choice for DIY builders in Australia — particularly renters or homeowners who may want to relocate the shed in future. Here’s how it works:
- Prepare the site. Clear and level an area 3.2m × 3.8m (slightly larger than the shed footprint). Compact the ground with a hand tamper or plate compactor. Add a 75–100mm layer of compacted road base or gravel for drainage.
- Set the bearers. Lay three 140×45mm H3 treated pine skids parallel to each other across the width of the site, spaced equally (at 0, 1.8m, and 3.6m from one end). Check that they’re level with each other — this is the most important step. Use a long spirit level and prop up low skids with hardwood packing or adjustable stirrups.
- Build the floor frame. Fix 90×45mm H3 treated pine joists across the bearers at 450mm centres, using joist hangers or toenailing. Check for square by measuring the diagonals — they must be equal.
- Lay the floor decking. Fix 19mm structural plywood sheets with 65mm galvanised nails or screws. Stagger sheet joints across the joists. The decking becomes your working platform for wall framing.
Why this is the right choice for renters or those on tight budgets: no formwork, no mixing concrete, no waiting for curing. A skid foundation for a 10×12 shed can be completed in half a day. The limitation is permanence — on very reactive soils or high-rainfall areas, concrete footings or a slab will serve better long-term.
Roof Pitch Recommendation
For corrugated iron or Colorbond steel roofing on a 10×12 shed in Australia, use a minimum roof pitch of 15°. This is above the manufacturer’s minimum of 5° for corrugated steel, and gives significantly better drainage during the heavy rain events common in Queensland, NSW, and Victoria. A 15° pitch also gives you better ceiling height at the ridge without making the roof structure excessively tall. In cyclone-prone regions (QLD north of Townsville, NT, coastal WA), use 22° minimum and consult the relevant cyclone wind loading requirements in AS 4055.
Assembly Sequence
- Prepare and level the skid foundation
- Build the floor frame and lay decking
- Frame the four walls flat on the floor (bottom plate, top plate, studs at 450mm, door/window headers)
- Raise and brace each wall in sequence — rear wall first, then front, then sides
- Install the doubled top plate to tie walls together at the corners
- Install ceiling joists or collar ties before roof framing begins
- Install ridge board and rafters
- Fit purlins at the correct spacing for your roofing profile
- Install roofing sheets from bottom to top, overlapping correctly
- Fix cladding, door frame, and door hardware
- Paint or seal if using timber cladding
Build Yours Right the First Time
A well-built 10×12 shed from accurate plans will outlast the house it sits behind. The key is having precise cut lists, correctly sized structural members, and clear step-by-step instructions that account for Australian building conventions — not US or UK standards.
Ted’s Woodworking includes full 10×12 shed plans sized for metric Australian timber, with every cut listed and every step illustrated. It’s the fastest way to move from idea to built.
Get complete 10×12 shed plans and 16,000+ projects at Ted’s Woodworking →