A 12×16 shed is where backyard storage becomes a genuine living space for your tools and projects. At 17.8m², you have enough floor area for a ride-on mower bay, a full-length workbench, wall tool storage, and a dedicated zone for seasonal gear — and when you add a loft, you essentially double that without touching your building footprint. For Australian homeowners who are serious about their backyard workshop or need heavy equipment storage alongside tidy organisation, the 12×16 with loft is the benchmark build.
What a 12×16 Shed Gives You
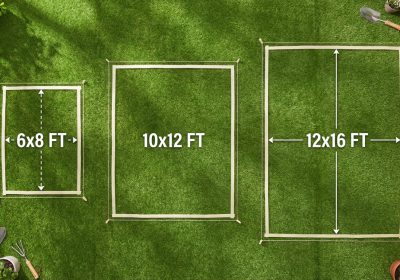
Without a loft, the 12×16 footprint comfortably fits:
- A ride-on mower (most models fit in a 2.0m × 2.2m bay)
- A full-length workbench (up to 3.6m) along one wall
- Deep shelving along two remaining walls
- Clear floor space for working, moving equipment around, and a welding trolley or similar
Add a loft over the rear half of the shed (a 6×8 loft area, roughly 4.4m²) and you gain: overhead storage for seasonal items, camping gear, long lengths of timber, insulation rolls, or a second workspace. The loft doesn’t reduce ground floor usability when it’s framed at a height that allows clearance for standing work below (minimum 2.1m floor-to-loft clearance recommended).
Building Permit Requirements in Australia
A 12×16 shed at 17.8m² is well above the general 10m² permit-free threshold that most Australian councils apply to Class 10a outbuildings. You will almost certainly need a building permit for this shed. Requirements vary by state but typically include: an approved building application, a site plan showing setbacks, potentially a structural engineer’s certification, and an inspection at the slab or footings stage. In Queensland, the Queensland Development Code MP1.2 governs outbuilding rules. In NSW, the SEPP (Exempt and Complying Development Codes) 2008 sets the thresholds. Contact your local council planning department early — approval can take 2–6 weeks in busy periods.
Foundation Recommendation
At this size and weight, a concrete slab is strongly recommended. A 100mm reinforced slab with F72 mesh provides a level, permanent base that handles the load of a ride-on mower and a well-stocked workshop without movement or settling. Timber skids can work for a 12×16 on flat, stable ground, but any seasonal soil movement will show up as racking or sticking doors over time. If you’re in an area with reactive clay soils (common across much of Victoria, South Australia, and Queensland), a slab with edge beams designed to AS 2870 is the only appropriate choice.
Loft Framing: How to Build It
A loft in a 12×16 shed typically spans the rear 4.8m (16ft) width of the shed and runs back about 2.4m from the rear wall, leaving the front of the shed open to full ceiling height. The loft is essentially a suspended floor frame, and it needs to be engineered to handle the loads you’ll put on it.
Recommended Joist Specification
For a residential shed loft with general storage loads (not heavy machinery), 190×45mm LVL (Laminated Veneer Lumber) joists at 600mm centres spanning up to 2.4m are a practical and code-appropriate choice in most Australian situations. LVL is stiffer and more consistent than solid timber, which matters when joists are spanning unsupported distances.
| Joist Size | Max Span at 600mm Centres | Load Rating (approx.) | Notes |
|---|---|---|---|
| 140×45 LVL | 1.8m | ~1.5 kPa | Light storage only — boxes, camping gear |
| 190×45 LVL | 2.4m | ~1.5 kPa | General storage: bins, tools, seasonal items |
| 240×45 LVL | 3.0m | ~1.5–2.0 kPa | Larger spans; consider engineer sign-off |
| 290×45 LVL | 3.6m+ | ~2.0 kPa | Engineer certification recommended |
Important: The figures above are indicative only. For a permitted build, your structural framing needs to comply with AS 1684 (Residential timber-framed construction) or be certified by a structural engineer. Loft loads should be specified on your building application. The Australian standard residential live load for storage is 1.5 kPa — do not exceed this without engineering certification.
Loft Construction Steps
- Install a ledger board (190×45mm LVL or structural timber) on the rear and side walls at your desired loft height. Fix into wall studs or blocking with M12 structural bolts or joist hanger hardware.
- Cut your loft joists to span from the rear ledger to a front beam. The front beam should be supported by posts or drop from the roof structure — confirm loads with your plan.
- Hang joists using LUS joist hangers (Simpson Strong-Tie or equivalent) at the specified spacing (600mm centres).
- Fix 19mm structural-grade plywood or 90×19mm dressed timber decking across the joists as the loft floor.
- Install edge blocking where the loft floor meets open space to prevent material sliding off.
Safety: Handrails, Access, and Head Height
Under the National Construction Code (NCC), any accessible floor level more than 1.0m above the floor below requires a balustrade or handrail. For a shed loft, this means installing a 1.0m-high handrail along the open edge of the loft — typically simple timber posts and a horizontal rail at 1.0m, with balusters or horizontal rails that prevent a 125mm sphere from passing through (child safety requirement if applicable).
Access options:
- Fixed timber ladder: The simplest option. A stair-angle fixed ladder at 60–70° is safer than a straight vertical ladder and takes less floor space than a staircase. Minimum 400mm rung width.
- Alternating tread stair: Takes roughly 1.2m × 0.8m of floor space, allows you to carry items up with both hands, and is much more comfortable than a ladder. Good choice if you’ll access the loft regularly.
- Pull-down attic ladder: Best for infrequent access to pure storage. Mounts in the loft floor; folds away when not in use. Limits the size of items you can move up and down.
Minimum recommended head clearance at the top of the ladder/stair: 2.0m measured from the loft floor to the roof structure above.
Roof Structure for a 12×16 with Loft
A gable roof with a pitch of 25–30° is ideal for a 12×16 shed with loft. The increased pitch provides more vertical clearance at the ridge and better drainage for Australian rain events. Use 140×45mm rafters at 600mm centres for the main roof span. Collar ties (90×45mm at every second rafter pair, in the upper third of the rafter height) prevent the roof from spreading under wind or snow loads in elevated areas.
Get Complete Loft Shed Plans
Framing a shed with a loft involves more structural decisions than a standard storage shed — joist sizing, ledger fixing, handrail geometry, access planning, and load calculations all need to be right before you start cutting timber. The best way to get this right is to work from professionally drawn plans that include all the details.
Ted’s Woodworking includes comprehensive shed plans with loft configurations, full cut lists, and step-by-step framing guides for every size from 8×10 up to large workshop structures. Over 16,000 projects are available instantly.
Get your 12×16 shed with loft plans at Ted’s Woodworking →