This post may contain affiliate links. If you purchase through our links we may earn a small commission at no extra cost to you. Learn more.
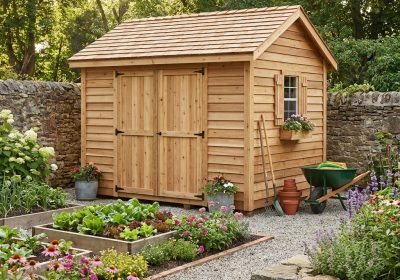
Building a shed from scratch is a weekend project — but only if you go in with a real plan. This guide walks you through every stage: foundation, floor, walls, roof, and weatherproofing. We’ll use a 10×12 gable shed as the working example. It’s the most common beginner size: big enough for a mower, bikes, and garden tools; small enough to build solo.
Finished size: 10′ wide × 12′ deep × 8′ tall at the walls (10’+ at the roof peak)
Skill level: Intermediate beginner — you need to be comfortable with a circular saw and know how to use a speed square
Build time: 2–3 full weekends
Estimated cost: $1,200–$1,800 depending on siding and roofing choices
Before You Start: Permits and Site Rules
In most Australian councils and US counties, sheds under a certain size don’t require a permit — but check your local council/HOA rules first. In Australia, sheds up to 10m² (roughly 10×10 ft) are typically exempt but this varies by state and by setback from boundaries. In the US, most municipalities allow sheds up to 120 sq ft without a permit.
Never assume you’re exempt. A shed built without the required approval can be ordered demolished. A 15-minute phone call to your council saves thousands.
Watch the Full Build
And a second complete build showing the framing in detail:
Materials List — 10×12 Gable Shed
Foundation & Floor
| Material | Qty | Purpose |
|---|---|---|
| Concrete deck blocks (solid) | 6 | Foundation supports (corners + midpoints) |
| Compactable gravel | ½ yard | Base for deck blocks (drainage layer) |
| 4×6 skid beams × 12′ | 2 | Perimeter rim across the width |
| 2×6×12′ pressure treated | 2 | Perimeter rim (long sides) |
| 2×6×9′ pressure treated | 8 | Floor joists on 16″ centres |
| ¾” T&G plywood × 4’×8′ | 4 sheets | Floor decking (tongue-and-groove) |
Wall Framing
| Material | Qty | Purpose |
|---|---|---|
| 2×4×8′ stud grade | 60 | Wall studs, plates, headers |
| 2×4×10′ stud grade | 8 | Top plates (long walls) |
| 2×4×12′ stud grade | 4 | Top plates (end walls) |
Roof Framing
| Material | Qty | Purpose |
|---|---|---|
| 2×6×14′ rafters | 14 | Roof rafters on 24″ centres |
| 2×4×8′ | 4 | Ridge board and collar ties |
| ½” OSB or plywood × 4’×8′ | 12 sheets | Roof sheathing |
Roofing
| Material | Qty | Purpose |
|---|---|---|
| 15# roofing felt (underlayment) | 1 roll | Weather barrier under shingles |
| Architectural shingles (3-tab) | 6 squares | Final weatherproofing (1 square = 100 sq ft) |
| Drip edge (aluminium) | 60 linear ft | Edge protection |
| Ridge cap shingles | 1 bundle | Ridge coverage |
Siding & Trim
| Material | Qty | Purpose |
|---|---|---|
| T1-11 siding panels (4’×8′) | 10 sheets | Wall siding (includes sheathing) |
| 1×4 corner boards × 8′ | 8 | Vertical corner trim |
| 1×6 fascia × 8′ | 8 | Eave and gable trim |
Door & Hardware
- Pre-hung exterior door (32″×80″ is standard) OR build a Z-brace door from 1×6 boards
- Door hardware: hinges (3 per door), hasp latch or deadbolt
- Joist hanger hardware: 16 joist hangers + 1¼” joist hanger nails
- Structural screws: 3″ (GRK or similar) — 5 lbs
- Roofing nails: 2 lbs
- Exterior caulk: 4 tubes
- Exterior primer + paint: 2 gallons
Tools Required
- Circular saw with framing blade
- Framing square (essential for rafter layout)
- Speed square
- Drill/driver + impact driver
- Chalk line
- Level (4′ level minimum, 6′ preferred)
- Tape measure
- Hammer
- Ladder (6′ and 8′)
- Pneumatic nail gun (optional — speeds up sheathing and framing significantly)
Step-by-Step Build
Stage 1 — Site Preparation and Foundation
Site selection: Choose a level spot with good drainage. Avoid low spots where water pools. Allow at least 18″ clearance from any fence or boundary (more if your council requires it).
- Mark out a 10’×12′ area with stakes and string lines
- Remove any grass or topsoil within the area — you want the floor sitting on gravel, not soil that will compact unevenly and hold moisture
- Dig 6 holes for your concrete deck blocks, 12″ diameter × 6″ deep, at the four corners and two midpoints on the long sides
- Fill each hole with compactable gravel, tamp firmly
- Set a deck block in each hole. Use a long straight board and a level to confirm all 6 blocks are on the same plane. This is the most important step in the whole build — an unlevel foundation makes every subsequent step harder
Checking level across all blocks: Set your 4′ level on a long straight 2×4 spanning between blocks. Adjust blocks by adding or removing gravel underneath until all 6 are within ¼” of each other in height.
Stage 2 — Floor Frame
- Lay your two 4×6 skid beams across the deck blocks running the 12′ length. These are your main runners
- Build the floor frame on top: set 2×6 rim joists along all 4 perimeter edges, joined at corners with 3″ screws
- Add 2×6 floor joists between the long rim joists on 16″ centres (you’ll have 7 interior joists across the 10′ width)
- Attach each joist with joist hangers — don’t just toenail them, hangers carry the load
- Check the frame is square: measure diagonally corner to corner. Both diagonals should match within ¼”
- Nail down ¾” T&G plywood panels for the floor. Stagger the seams. Apply construction adhesive to every joist before laying each sheet
Stage 3 — Wall Framing
Frame all four walls flat on the floor, then tilt them up. This is far easier than framing in place.
Wall anatomy: Each wall has a bottom plate, two top plates (double top plate), and studs on 16″ centres.
- Front wall (with door): Frame a 10′ wall with a rough door opening 2″ wider and 2″ taller than your door (so 34″×82″ for a 32″×80″ door). Add a doubled 2×6 header above the opening
- Back wall: A simple 10′ wall with studs every 16″
- Side walls: 12′ long. The top plate follows the roof pitch — mark the top edge of your end studs at the correct height for the rafter line. For an 8′ wall height at the eaves with a 4/12 pitch roof, the end studs are 8′ but the centre stud (at the peak) is taller
- Tip all walls up into position, brace temporarily with 2×4 diagonal braces screwed to stakes in the ground
- Nail the bottom plates to the floor using 3″ structural screws or 16d nails every 16″
- Connect wall corners and check that all walls are plumb (perfectly vertical). Adjust braces until a level confirms plumb, then lock the braces in
- Install the double top plate, lapping the corners for structural connection
Stage 4 — Roof Framing
Roof framing is where most first-timers slow down. The key is the rafter template.
Rafter calculation for a 4/12 pitch (4″ rise for every 12″ of run): For a 10′ wide shed, the run is 5′ (half the width).
- Rise = 5′ × 4/12 = 20″ (1’8″)
- Rafter length (the hypotenuse) = √(60² + 20²) = √(3600 + 400) = √4000 = 63.2″ ≈ 63¼”
- Add 12″ for eave overhang = total rafter board length ≈ 76″
- Cut one rafter to the calculated length with a plumb cut at the ridge (vertical cut at the peak, angled to match pitch) and a bird’s mouth notch where it sits on the wall top plate
- Bird’s mouth: This is a notch cut into the underside of the rafter so it sits flat on the wall plate. For a 4/12 pitch: the seat cut is level (horizontal) and 3½” wide; the plumb cut is angled to match the pitch
- Test this template rafter on the wall before cutting all 14 — lay it in place and check that the bird’s mouth seats flat, the plumb cut aligns with the ridge centreline, and the tail hangs out at the correct overhang
- Once confirmed, use the template to trace and cut all remaining rafters
- Set the ridge board first, supported temporarily at the correct height, then attach rafters in pairs on opposite sides
- Nail each rafter pair at the ridge with 3 × 16d nails, and toe-nail the bird’s mouth into the top plate
Stage 5 — Roof Sheathing
- Start at the bottom edge (eave) of one side. Snap a chalk line to keep the first course straight
- Nail ½” OSB or plywood sheets with 8d ring-shank nails every 6″ along edges and 12″ in the field
- Stagger seams. Don’t let four corners meet at the same point
- Install metal drip edge along the eaves (before felt) and along the rakes/gables (after felt)
- Roll out 15# roofing felt horizontally from the bottom, lapping each course 6″ over the one below. Staple every 12″
Stage 6 — Shingles
- Install a starter strip of shingles along the eave edge (adhesive side up — it seals the first full course)
- Lay the first course of shingles flush with the drip edge
- Each subsequent course overlaps the one below so the tab slots don’t align (stagger by 6″ each course)
- Nail each shingle with 4 nails above the adhesive strip — if nails miss this zone, shingles blow off in wind
- Cap the ridge with ridge cap shingles or cut full shingles into thirds and fold them over the peak
Stage 7 — Siding and Trim
- Install corner boards (1×4) on all four corners before the siding — siding butts up against these
- T1-11 siding goes on in 4’×8′ panels, starting from a bottom corner. Leave a 2″ gap between the bottom edge of the siding and the ground to prevent rot
- Nail every 6″ along edges and 12″ in the field with 8d galvanised nails
- Caulk all seams, around the door frame, and where siding meets corner boards
- Prime and paint within 2 weeks of installation — unprimed T1-11 will swell and delaminate
Stage 8 — Door
The simplest approach for a shed is a Z-brace door: two panels of 1×6 boards running horizontally, held together by a diagonal 1×6 brace (the Z) and vertical 1×4 battens on the back. This is stronger than it looks and costs about $40.
- Cut 6 horizontal boards per door half to fill the opening width
- Glue and screw 1×4 battens across the back to hold them together
- Add the diagonal Z-brace (runs from the bottom hinge corner up to the opposite top corner) to prevent sagging
- Hang on three 4″ strap hinges per leaf, shimming the door into the frame with even gaps (⅛” all around) before fastening hinges
Common Mistakes That Cause Big Problems
- Skipping the level foundation check — if the blocks aren’t level, nothing will be square or plumb above them. Fix it before you nail a single board
- Not using pressure-treated lumber for the floor frame — regular lumber sitting close to ground will rot within 3–5 years. All floor framing must be PT
- Framing studs on 24″ centres to save lumber — for T1-11 siding (which is also structural), 16″ centres are required. T1-11 on 24″ centres will flex and crack
- Forgetting bird’s mouth depth — if the seat cut is too deep, you weaken the rafter. The rule: the seat cut should not exceed ⅓ of the rafter depth
- Not caulking siding seams immediately — water infiltrates horizontal seams fast. Caulk the day you install siding
Cost Breakdown
| Category | Approx. cost |
|---|---|
| Foundation (blocks + gravel) | $80–$120 |
| Floor framing (PT lumber + plywood) | $180–$250 |
| Wall framing lumber | $220–$320 |
| Roof framing lumber + OSB | $160–$220 |
| Roofing (felt + shingles + drip edge) | $180–$280 |
| Siding (T1-11 + trim boards) | $250–$350 |
| Door + hardware | $80–$200 |
| Fasteners, caulk, paint | $80–$120 |
| Total | $1,230–$1,860 |
A similar shed from a kit costs $1,500–$3,500, and a contractor-built shed runs $3,000–$7,000 for this size. Building yourself saves $1,500–$5,000 and gives you a better result because you control every material choice.
Want Complete Plans With Diagrams?
My Shed Plans includes over 12,000 shed designs with full framing diagrams, cut lists, and step-by-step instructions for every size from 4×4 to 16×20 — including designs with lofts, windows, skylights, and attached lean-tos.