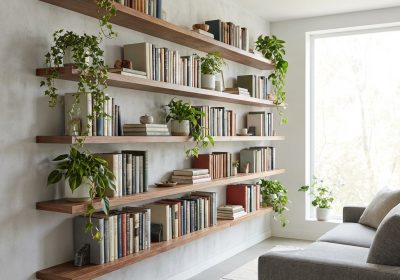
Floor-to-ceiling built-in bookshelves are the single biggest visual upgrade you can make to a room. They add storage, they add warmth, and — when done right — they make a standard rental-grade wall look like custom architecture. The good news for DIYers is that a built-in is fundamentally just a plywood box attached to the wall and finished to blend in. You don’t need a cabinet maker’s skills. You need accurate measuring, careful scribing, and patience with the finishing. This guide covers the full process for a 2.4 m tall × 1.2 m wide unit using Australian Bunnings materials.
Planning Your Built-In
Measure the Wall Accurately
Australian residential rooms are rarely perfectly square or plumb. Measure your wall in at least three places — floor, middle, and ceiling height. Measure the width at floor level, mid-height, and at ceiling level. Note the differences. A variation of 5–10 mm is typical and manageable with scribing. More than 20 mm variation means you’ll need to scribe extensively or frame out the wall first.
Check whether the floor is level using a long spirit level or a laser level. If the floor drops toward the wall, you’ll need to shim the base of the unit to keep the shelves level.
Decide: Fixed vs Adjustable Shelves
Fixed shelves are stronger and visually cleaner, but you’re committed to the spacing once the unit is built. Good for shelves storing items of consistent height — books, files, display pieces.
Adjustable shelves use shelf pin holes drilled at regular intervals (32 mm system is standard) in the inside faces of the side panels. Shelves rest on removable pins and can be repositioned. Slightly more complex to build — you need a shelf pin drilling jig for accuracy — but far more flexible over time. Recommended for anything that might store items of varying heights.
Account for Baseboard Height
Standard Australian skirting board is 67 mm, 90 mm, or higher in older homes. You have two options: cut a notch in the base of the unit to sit over the skirting, or remove the skirting behind the unit and re-install it outside the unit at the end. Removing and re-installing the skirting gives the cleanest result — the unit appears to grow from the floor with no gap. Notching is easier but leaves a visible line between the unit and the wall.
Cut List — 2.4 m × 1.2 m Built-In Unit
| Part | Material | Length | Width | Thickness | Qty |
|---|---|---|---|---|---|
| Side panels | 18 mm MDF shelving panel | 2340 mm | 300 mm | 18 mm | 2 |
| Top panel (under crown) | 18 mm MDF shelving panel | 1164 mm | 300 mm | 18 mm | 1 |
| Base panel (above floor) | 18 mm MDF shelving panel | 1164 mm | 300 mm | 18 mm | 1 |
| Fixed shelves | 18 mm MDF shelving panel | 1164 mm | 282 mm | 18 mm | 4 |
| Back panel (optional) | 6 mm MDF or hardboard | 2340 mm | 1200 mm | 6 mm | 1 |
| Face frame rails (horizontal) | 42 × 19 mm pine DAR | 1200 mm | 42 mm | 19 mm | 4 |
| Face frame stiles (vertical) | 42 × 19 mm pine DAR | 2400 mm | 42 mm | 19 mm | 2 |
| Crown moulding | Pine 67 mm cove or ogee | 1400 mm | — | — | 1 length |
Note: Shelf width of 1164 mm = 1200 mm opening minus 2 × 18 mm side panels. Shelf depth of 282 mm = 300 mm panel depth minus 18 mm back panel. Adjust all dimensions to your measured wall opening.
Step-by-Step Build Instructions
- Build the carcass box. Assemble the two side panels, base panel, and top panel into a rectangular box using 50 mm countersunk MDF screws and PVA glue. Pre-drill all holes to prevent the MDF from splitting at the edges. Check the box for square by measuring both diagonals — they should be equal within 2 mm. Clamp and let the glue cure.
- Install fixed shelves (or drill shelf pin holes). For fixed shelves, mark the shelf positions on the inside of both side panels. Drill two pocket holes or countersunk pilot holes from the outside of each side panel into the shelf ends. Apply glue and drive screws. For adjustable shelves, use a shelf pin drilling jig to drill 5 mm holes at 32 mm centres on both inner faces before assembling the box.
- Fit the back panel. Nail or staple the 6 mm back panel to the rear of the assembled box. This squares the unit permanently — without a back panel, a large carcass can rack under load. If you’re installing against a flat wall and the wall will act as the back, you can omit the back panel, but the unit will be less rigid.
- Scribe the side panels to the wall. Stand the unit against the wall in its final position. Use a compass or scribing tool set to the widest gap between the side panel and the wall, and run it down the length of the panel, keeping the pencil parallel to the wall face. This transfers the wall’s profile (bumps, texture, out-of-plumb) onto the panel. Remove the unit, cut along the scribe line with a jigsaw, and test the fit. The panel should now sit flush against the wall along its full height.
- Fix the unit to the wall. Stand the unit in position. Check it’s plumb side-to-side and front-to-back with a spirit level. Shim the base if the floor is uneven. Drive 75 mm timber screws through the back panel or the rear top rail into the wall studs — minimum two fixing points. Use a stud finder first. The unit should be solid and not rock.
- Install the face frame. The face frame (the pine border visible from the front) covers the MDF edges and defines the finished look. Glue and nail the vertical stiles first, then the horizontal rails. Use a nail gun or hand-drive 50 mm nails. The face frame should be flush with the inside face of the carcass on all shelf openings.
- Fill, sand, and prime. Fill all nail holes, screw heads, and any gaps with a flexible filler or MDF filler. Sand the face frame smooth at 120 then 180 grit. Apply one coat of PVA sealer or primer to all MDF surfaces — MDF is very absorbent and will consume paint without sealing first.
- Install crown moulding at the top. This is what makes the unit look genuinely built-in rather than a box sitting on the floor. The crown moulding bridges the gap between the top of the unit and the ceiling (there will always be a gap — ceilings are never perfectly flat). Cut the moulding at 45 degrees at the front corners. Nail or glue it to the top of the face frame and tack it to the ceiling. Fill the nail holes, prime, and paint to match.
- Final paint coat. Two coats of interior semi-gloss or satin paint in the same colour as the wall (or in a contrasting colour if you want the unit to stand out). Painting the interior back of the unit in a darker shade makes the shelves visually pop.
Scribing to Uneven Walls
The scribing step in Step 4 is the most important technique in this entire build. An unscribed panel against an uneven wall will have a visible gap along the wall — even a 2 mm gap in a painted finish looks bad and breaks the illusion of a built-in. Take your time with the compass, cut conservatively, and test-fit before cutting the full depth of the scribe. You can always remove more material; you can’t put it back.
For very uneven walls (old homes, brick, stone), use a flexible sealant or cornice cement along the wall edge after installation rather than scribing. Apply it with a caulking gun and tool it smooth — it fills gaps up to 10 mm and looks seamless once painted.
Cable Management if Near a TV
If the built-in is flanking or surrounding a television, plan for cable routing before you install the unit. Options include:
- Drilling 50 mm holes in the side panels and shelves to route cables vertically inside the unit
- Installing a surface-mount cable raceway along the back of the unit before the back panel goes on
- Cutting a small notch in the baseboard area of the back panel to route cables behind the unit along the floor
Drilling holes in MDF after painting is possible but messy. Plan this before you paint.
Australian Material Sourcing
Bunnings stocks white melamine-coated MDF shelving panels in 1200 mm and 2400 mm lengths, pre-finished on both faces. These are ideal for the carcass — they require minimal finishing and are dimensionally stable. The face frame pine, crown moulding, and back panel are all also available at Bunnings. Budget approximately AU$150–$200 in materials for a single 2.4 m × 1.2 m unit at 2025 pricing.
Build Your Full Library Wall
Once you’ve built one unit, adding a second unit beside it is straightforward — you’re repeating the same process. Built-in bookshelves are one of the highest-return projects you can undertake in terms of the value they add to a home versus the material cost. When you’re ready to expand your plans library, Ted’s Woodworking includes detailed built-in cabinetry plans, including full wall units, entertainment centres, and home office built-ins with complete cut lists and finishing guides.