A simple wooden playhouse is one of the most rewarding outdoor builds you can do for young children — and at 1.8m × 1.2m, this design is compact enough to fit most suburban backyards while still being big enough for two or three kids to play inside comfortably. This is a ground-level structure, no climbing or height involved, making it the most approachable playhouse build for a first-time builder. Follow the plans below and you’ll have it framed in a day and fully finished over a weekend.
Foundation Options for Australian Conditions
The most common mistake with backyard structures in Australia is placing treated timber in direct contact with the ground. Even H4-treated pine will eventually rot when buried or sitting in moisture, especially in Queensland, NSW coastal areas, and the wet tropics. Two foundation methods work well for a ground-level playhouse:
Option 1 — Concrete pad footings: Pour four 300mm × 300mm × 150mm concrete pads at the four corners and two midspan supports along the long sides. Let them cure for 48 hours, then sit your bearer skids on top. This is the most permanent and stable option. Cost: approximately $30–$60 in concrete.
Option 2 — Treated pine skids: Use 140×45mm H4-treated pine skids (two running the full 1.8m length of the structure). Sit them on gravel or compacted road base, NOT bare soil. Elevating slightly off the soil surface, even by 20mm, dramatically extends the life of the timber. This is faster and easier than concrete pads and works well in well-drained locations.
Do not use untreated pine, hardwood, or plywood in contact with or near the ground. In Australia’s humidity and termite environment, this will fail within a few years.
Cut List and Materials
| Part | Qty | Length | Section | Material |
|---|---|---|---|---|
| Floor bearer skids | 2 | 1800mm | 140×45mm | H4 treated pine |
| Floor joists | 4 | 1200mm | 90×45mm | H3 treated pine |
| Floor decking / sheeting | 1 sheet | 1800mm | 1200mm wide | 19mm H3 ply or decking boards |
| Wall bottom plates | 4 | 1800mm / 1200mm alternating | 90×45mm | MGP10 framing pine |
| Wall top plates | 4 | 1800mm / 1200mm alternating | 90×45mm | MGP10 framing pine |
| Wall studs | 12 | 1200mm | 90×45mm | MGP10 framing pine |
| Door / window trimmers | 4 | 900mm | 90×45mm | MGP10 framing pine |
| Wall cladding / sheeting | 3 sheets | 1800×1200mm | 9mm | Exterior-grade ply or T&G cladding |
| Roof rafters (flat skillion) | 3 | 1300mm | 90×45mm | MGP10 framing pine |
| Roof sheeting | 1 sheet | 1900×1300mm | — | See roofing options below |
Approximate Materials Cost (AU$)
| Material | Quantity | Est. Cost (AU$) |
|---|---|---|
| H4 treated pine bearer skids (140×45mm) | 4 lineal metres | $25–$35 |
| H3 treated pine (90×45mm, floor joists) | 5 lineal metres | $18–$25 |
| MGP10 framing pine (90×45mm, walls + rafters) | 30 lineal metres | $75–$100 |
| 19mm H3 structural ply (floor) | 1 sheet (2400×1200mm) | $55–$70 |
| 9mm exterior ply (wall sheeting) | 3 sheets | $120–$150 |
| Roofing iron or polycarbonate | 1 sheet 1900×1300mm | $40–$80 |
| Fasteners, joist hangers, hardware | — | $30–$50 |
| Exterior paint, primer | 2L primer + 4L colour | $50–$80 |
| Total estimated cost | $413–$590 |
Roof Options
Flat skillion roof (recommended for beginners): The simplest roof design. The rear wall is built 150mm taller than the front wall, creating a natural fall for water runoff. Three simple rafters span from front to back and are covered with a single sheet of corrugated iron or heavy-duty polycarbonate. Zero complex cutting required. Ensure the lower end of the roof overhangs the front wall by at least 100mm to keep rain off the doorway.
Simple gable roof: More visually attractive but requires cutting rafter angles and a ridge board. If you’re comfortable with a mitre saw and want the cottage look, a gable roof is achievable in a half-day. Cut all rafters to matching pairs with a 30° plumb cut at the ridge and a matching bird’s mouth cut at the wall plate.
Step-by-Step Build Sequence
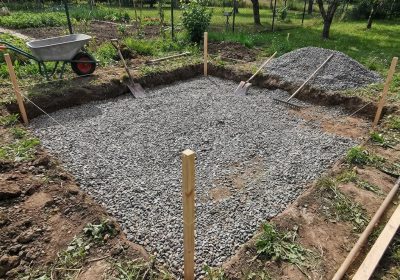
- Prepare the site and lay foundations. Clear vegetation, level the ground, and install your concrete pads or skid foundation. Check level across all support points with a long spirit level or laser level.
- Build the floor frame. Lay the two bearer skids, then install floor joists across them at 600mm centres using joist hangers. Screw the floor sheeting panel down to the joists with 50mm structural screws.
- Frame the four walls. Build each wall frame flat on the floor or ground. Mark out stud positions at 600mm centres on your top and bottom plates. Nail or screw studs in place. Leave an opening in the front wall for a door (a 600mm-wide × 900mm-tall opening works well for kids). Leave a window opening in each side wall if desired (a 450mm × 450mm opening is a good size).
- Stand and brace the walls. Lift each framed wall into position on the floor frame and fix with temporary diagonal bracing. Check for plumb (vertical) in both directions. Connect the corners with framing screws through the end studs. Fix the bottom plates to the floor frame with 90mm screws.
- Install the roof rafters. With a skillion design, simply cut three rafters to length (allowing for front overhang) and screw them into the top plates using rafter ties or hurricane brackets. Space them evenly.
- Sheet the walls. Screw exterior ply cladding to the wall frames. The ply sheets span full height from bottom plate to top plate. Pre-cut window and door openings with a jigsaw before installing.
- Install roofing. Lay corrugated iron or polycarbonate over the rafters and screw down with roofing screws (the kind with rubber washers to seal around the screw). Ensure the front and side overhangs are equal.
- Add door and window details. A simple door is a piece of 9mm ply cut to size and hung on two butt hinges. A simple window surround is 45×19mm pine trim glued and pinned around the opening.
- Sand all exposed timber edges. Pay particular attention to any corner where a child might catch bare skin. All external corners should be slightly rounded.
- Paint. Apply an exterior primer first, then two coats of exterior water-based paint. Non-toxic once fully cured. Let the children pick the colour.
Finish and Longevity Tips
In the Australian climate, the biggest enemies of an outdoor timber structure are moisture and UV. Keep the roof overhang generous, paint all faces of the timber before assembly if possible (including the inside faces of wall sheets that will be hard to reach later), and repaint the exterior every 3–5 years. Add a simple termite inspection gap at the base — a 50mm clearance between the floor and any garden bed prevents termite highways forming under cover.
Want the Full Set of Plans?
This simple playhouse is a fantastic starter build, and once it’s done you’ll have the skills and confidence to take on the larger playhouse designs with verandahs, lofts, and full gable roofs. Ted’s Woodworking has an extensive library of playhouse plans — from simple starter designs to elaborate two-storey structures — all with complete cut lists, diagrams, and step-by-step instructions for every skill level.