Building your own shed saves $1,500–$5,000 compared to buying a kit or hiring a contractor. A well-built wooden shed lasts 20–30 years, can be exactly the size you need, and adds genuine value to your property. This guide walks through everything you need to know before you break ground.
Choosing the Right Shed Size
The most common beginner mistake: building a shed that’s too small. Think about everything you’ll store, then go one size up. Here’s a quick guide:
| Size | Best for | Approx. materials cost |
|---|---|---|
| 6×8 | Lawn mower, hand tools, bikes | $400–$600 |
| 8×10 | Full lawn gear + storage overflow | $600–$900 |
| 10×12 | Workshop or large storage | $900–$1,400 |
| 12×16 | Full workshop with work bench space | $1,400–$2,000 |
| 16×20+ | Serious workshop or garage replacement | $2,000–$3,500 |
Foundation Options
Your shed foundation determines how long your shed lasts and how level it stays over time. Three main options:
Concrete Skids (Recommended for Beginners)
Two concrete blocks or poured skids, levelled side-by-side. The shed floor joists sit on top. No digging, no forms — just level the blocks and build. Works well for smaller sheds (up to 10×12) on reasonably flat ground.
Concrete Piers
Tube forms filled with concrete at each corner (and midpoints for larger sheds). More permanent and stable for larger structures. Requires digging below the frost line in cold climates.
Gravel Pad
A compacted gravel pad with pressure-treated skids on top. Good drainage, relatively easy to build. Works for any size shed and is the method most experienced shed builders use for non-workshop sheds.
Wall Framing Basics
Shed walls use the same stud framing as house walls, but simpler. The basic pattern: 2×4 studs, 16 inches on centre, between a bottom plate and a top plate. Mark your stud layout on both plates at the same time — lay them side by side and mark across both with a square. Nail through the plates into the stud ends. Stand the wall, brace it plumb, and move on to the next.
Roof Options
Lean-To (Easiest)
A single slope roof. One wall is taller than the opposite wall and the roof rafters slope between them. Virtually no rafter cuts needed — just a simple angle on each end. Best for small sheds or sheds built against a fence or house.
Gable Roof (Most Common)
The classic peaked roof. Requires cutting rafters with a consistent bird’s mouth cut and ridge angle. Looks great, sheds water well, and works on any shed size. Use the 3-4-5 triangle method or a rafter square to mark your cuts.
Step-by-Step Build Order
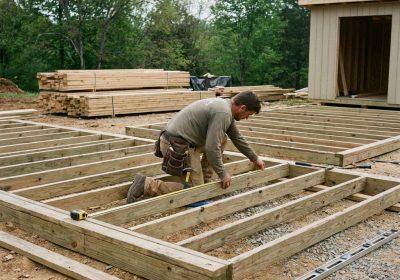
- Mark and prepare the foundation
- Build the floor frame from pressure-treated 2×6 joists
- Install 3/4″ plywood floor sheathing
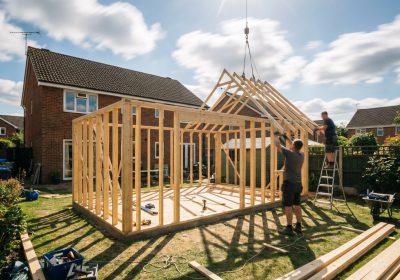
- Frame all four walls on the floor, then stand them
- Install temporary bracing and check for plumb and square
- Build and install the roof frame (rafters or trusses)
- Install roof sheathing (1/2″ plywood)
- Install roofing felt and shingles
- Install exterior sheathing or cladding
- Install doors, windows, trim, and paint
Get Full Shed Plans With Cut Lists
Building a shed from scratch without a good plan is the most common way to end up with an expensive mistake. A proper plan gives you the exact cut list, framing layout, and materials list before you buy a single board. My Shed Plans includes 12,000 shed plans covering every size and style — from simple lean-tos to full garage-sized workshops — all with step-by-step instructions and 3D diagrams.