You do not need expensive timber, a fully kitted workshop, or years of experience to build a coffee table that looks like it came from a high-end furniture store. This rustic pine coffee table costs around AU$40 in materials, uses timber you can buy at any Bunnings in the country, and takes a single day from first cut to first coat of finish. The secret is in how you treat the wood after it’s cut — a few low-tech techniques turn standard construction pine into something that looks genuinely aged and characterful.
Why 2×6 and 4×4 Pine?
Structural pine — the stuff sold in the framing section rather than the DAR (dressed all round) joinery section — is significantly cheaper than dressed timber. It’s rougher, has more knots, and carries the marks of the sawmill. For a rustic build, those aren’t flaws. They’re the point. The knots add visual interest. The mill marks give you something to enhance with a wire brush. You’re working with the material’s natural character instead of sanding it away.
In Australian hardware stores, this timber is sold as:
- 90 × 45 mm pine (the metric equivalent of 2×4, often called “2×4” informally despite its actual dimensions)
- 140 × 45 mm pine (the metric equivalent of 2×6)
- 90 × 90 mm pine (closest to 4×4)
This build uses 140 × 45 mm for the tabletop boards and 90 × 90 mm for the legs.
AU$40 Material Breakdown
| Item | Where to Buy | Qty/Length Needed | Est. Cost (AU$) |
|---|---|---|---|
| 140 × 45 mm structural pine | Bunnings | 5.4 m (three 1.8 m lengths) | $18.00 |
| 90 × 90 mm pine post | Bunnings | 1.8 m (one length) | $12.00 |
| PVA wood glue (small bottle) | Bunnings | 1 bottle | $6.00 |
| 60 mm galvanised hex-head bolts (decorative) | Bunnings fastener section | 8 bolts + washers + nuts | $4.00 |
| Total | ~$40.00 |
Note: Finish costs (wire brush, stain, polyurethane) add AU$20–$35 depending on what you already own. Sandpaper and screws are assumed to be already on hand.
Cut List
| Part | Material | Cut Length | Qty |
|---|---|---|---|
| Top boards | 140 × 45 mm pine | 1000 mm | 4 |
| Cross cleats (under-top battens) | 140 × 45 mm pine | 500 mm | 2 |
| Legs | 90 × 90 mm pine post | 420 mm | 4 |
Assembled dimensions: Approximately 1000 mm long × 560 mm wide × 420 mm tall (420 mm leg + 45 mm top board thickness = 465 mm. If that’s too tall, cut legs to 375 mm for a 420 mm final height.)
Step-by-Step Build Instructions
- Cut all pieces to length. Use a handsaw, circular saw, or mitre saw. The 140 × 45 mm pine will likely be bowed or slightly twisted — sort through the pile at Bunnings and pick the straightest boards you can find. Small knots are fine; deep splits or warps along the length are not.
- Wire brush the top boards. This is the technique that separates a rustic piece from a plain one. Using a wire brush (a drill-mounted wire cup brush works fast, or a hand wire brush if you’re patient), brush firmly along the grain of each board. The soft early-growth wood fibres abrade away, leaving the harder late-growth grain raised and textured. Work with the grain, not against it. Two or three passes over each board is enough. This takes about 20 minutes for all four top boards.
- Hand plane the surface for slight variation. Set a hand plane (or a belt sander in a pinch) to a very light cut and take one or two passes across the top boards. Do not try to make the surface perfectly flat — you want subtle ridges and variation that catch the stain differently. This gives the finished table a look of genuine age rather than new wood stained brown.
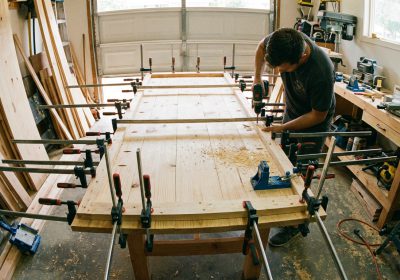
- Glue and assemble the tabletop. Lay the four top boards face-down on a flat surface. Apply PVA glue to the mating edges and clamp them tightly together with bar clamps or pipe clamps. Check the top face is flat as you clamp — put a straightedge across it. Let the glue cure for at least 2 hours, overnight if possible.
- Attach the cross cleats to the underside. Once the glued-up top is out of the clamps, flip it over. Position the two cross cleats at 150 mm in from each short end, running across the grain. Drill two pilot holes through each cleat into the top boards and drive 75 mm countersunk screws. Do not glue these — they are designed to allow the top to move with seasonal humidity changes.
- Pre-drill the leg bolt holes. The decorative hex-head bolts go through the cleat and into the top of each leg. Position each leg at the corner of the cross cleat, flush with the short end of the top. Drill a 6 mm clearance hole through the cleat and a 5 mm pilot hole into the leg top. Drive the 60 mm hex-head bolts with washers through the cleat into the leg. These carry the structural load and look intentionally industrial.
- Confirm height and attach legs. Stand the assembly on a flat floor, check all four legs are even, and tighten the bolts firmly. The table should be stable without racking — if it rocks, check the leg cuts are square. A small amount of shimming with a felt pad under the shortest leg is acceptable.
- Apply the rustic finish. See the finishing section below.
Rustic Finishing: Wire Brush + Dark Walnut Stain + Matte Poly
This three-step finish is what makes the build look intentional rather than cheap. Do not skip any step.
Step 1 — Wire Brush (already done in Step 2 above)
Re-visit any areas that look too smooth. The wire-brushed texture will hold stain differently from the surrounding flat grain — darker in the recesses, lighter on the raised ridges. This is exactly the effect you want.
Step 2 — Dark Walnut Stain
Feast Watson Dark Walnut (available at Bunnings) is an excellent choice for this build. Apply with a lint-free cloth or foam brush, working with the grain. The stain will absorb very unevenly into the pine — darker around the knots and in the wire-brushed recesses, lighter on the flat grain. This variation is what creates the aged-timber look. Let it dry for 4 hours, then evaluate. If you want a deeper tone, apply a second coat before the poly goes on.
Important: Apply a pine pre-conditioner (Feast Watson Pre-Stain Conditioner or equivalent) before the stain if you want more even colour. Skip it if you want maximum variation and contrast — for a rustic build, the uneven absorption is an asset.
Step 3 — Matte Polyurethane
Two coats of water-based matte polyurethane protect the surface. Water-based dries faster and doesn’t yellow over time the way oil-based poly does. Brush on a thin first coat, let it dry for 2 hours, lightly sand with 320 grit to knock back the raised grain, wipe the dust clean, and apply the second coat. A matte sheen is essential for the rustic look — satin or gloss will look wrong on this style of table.
Variations and Upgrades
Once the basic build is solid, you can go further. Add stretcher rails between the lower sections of the legs for a more complex look and additional rigidity. Use reclaimed timber instead of new pine — pallet boards, old fence palings, and salvaged floorboards all work beautifully with this finishing approach and cost nothing beyond your time cleaning them up. The rustic-industrial look also pairs well with hairpin legs (see Post 97) instead of the square 90 × 90 mm post legs used here.
Build More, Spend Less
At AU$40 for the materials, this table costs less than a single trip to IKEA and will last decades longer than flat-pack particleboard. When you’re ready to take the next step — more complex joinery, dovetailed drawers, mortise and tenon frames — Ted’s Woodworking gives you 16,000 plans to work from, with full materials lists and step-by-step instructions for every skill level.